Creating an API
Convert your workflows into an API endpoint using API Management by Gupshup integration platform. The workflows execute simply by calling the APIs at the client side as per the limits and quota-usage defined.
Let us create an API endpoint for our Callable Journey, Callable-Login API. Go to the Tools menu and click API Management.
Creating a path prefix
If you are creating an API for the first time, you’ll get a blank window asking to create a path prefix first. Enter the path prefix, say demo, and click the Save button:

Figure 1: Creating a path prefix
As soon as the path prefix is created, you’ll get a confirmation message and three tabs will get displayed on the API Management window:
- API collections
- Clients
- Settings
The created path prefix can be viewed in the Settings tab. You can create only one path prefix for all the API collections and endpoints. The created path prefix can neither be edited nor deleted.
Creating an API collection
Now, let us create an API collection that can store callable journeys as the official API endpoints. Switch to the API collections tab and click the + Create new API Collection button:

Figure 2: The API collections window
A form-like window will open with the following input fields:
- Name: The name of your API collection. E.g., Employee Login.
- Version: The version number of the API collection. E.g., v1.
- Description: The additional information about this API collection.
- Path: The path of this API collection. E.g., emp-login. This path along with the version number will append to the static API endpoint host:
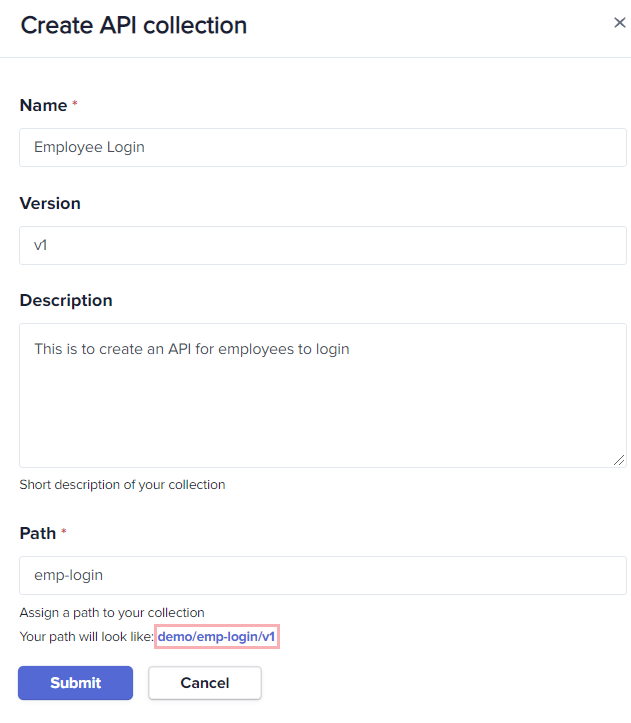
Figure 3: Creating an API Collection
As soon as you specify the path, a dynamic endpoint gets displayed down under as highlighted in the screenshot. This link is comprised of path_prefix/api_collection_path/version_number.
Click the Submit button. The API collection is now created successfully. However, it has no endpoints yet:

Figure 4: API Collection created
Creating an endpoint
Now, let us create an endpoint for this collection. Click the Employee Login API collection. A window appears as a blank canvas since there are no endpoints created. Click the + Create a new Endpoint button:

Figure 5: API Endpoint window
A form-like window will open with the following input fields:
- Name: The name of your API endpoint. E.g., Employee Login API Endpoint.
- Callable journey: The callable journey that you want to convert to an API endpoint. E.g., Get Card Details. The drop-down menu displays the name of the callable journeys that are in the running state.
- Method: The method for this API call is as per the functioning of the callable journey. E.g., GET. The additional information about this API collection.
Ensure you select the same method while executing the API else you’ll face an error.
- Path: The path of this API collection. E.g., card_details. This is the actual API path and gets
path will append to the API collection path:
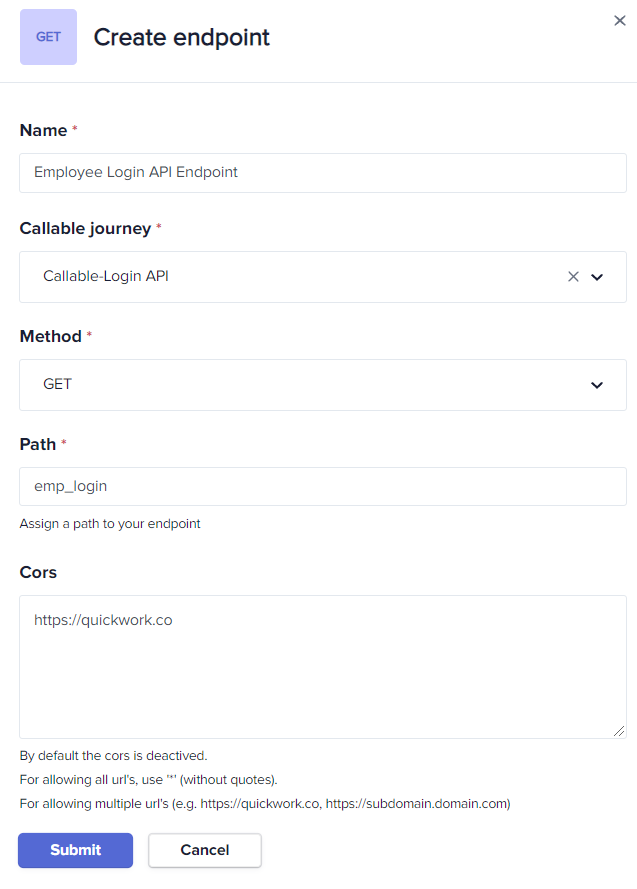
Figure 6: Creating an endpoint
-
    **Cors**: Cors (Cross-Origin Resource Sharing) permits the loading of the API
      endpoints or other resources from a specific domain or a list of domains. An
      API endpoint will be permitted only if it has been called from the domain server
      specified in this field. Specify * to allow this API
     endpoint getting called from any domain. Use a comma delimiter to specify more
     than one domain. https://sampledomain.com, etc.
Now, click the Submit button. The API endpoint for the designated callable journey will get created successfully.
You can edit the details of this endpoint and can delete it permanently from the account.
However, this API endpoint is partially configured. If you call this endpoint through any API development platform such as Swagger, Postman, etc, you’ll get the authentication error as No API key found in request:
This means you need to authorize this API endpoint by specifying the access profile API key under the Headers section. After successful authorization, you can use the API endpoint to call the dedicated callable journey, i.e., Callable-Login API journey in our case.
To get the API key, an access profile on the client-server is mandatory to build.
Creating a client
Switch to the Clients tab and click the + Create new Client button. Give a name for the client and Save:

Figure 10: A new client created
You can rename and delete the client account. As you can see, there are no access profiles in this newly created client. Let’s create one.
Creating an access profile
Click the client board and then click the + Create new Access Profile button. A form-like window will open with the following input fields:
1 Name: The name of the access profile. E.g., Employee login access profile.
2 API Collections: The name of the API collection that should be accessible to this client. You can select multiple API collections in a single access profile. One access profile can be used to access one or more API collections and their endpoints.
3 Description: The description of the access profile:
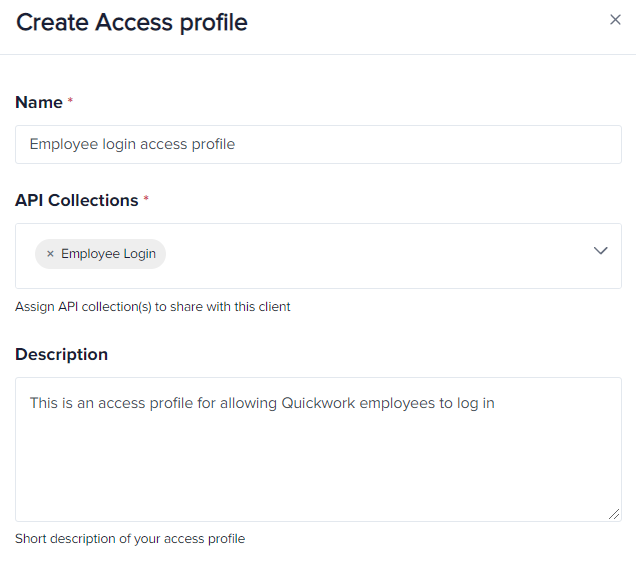
Figure 11: Creating an access profile
-
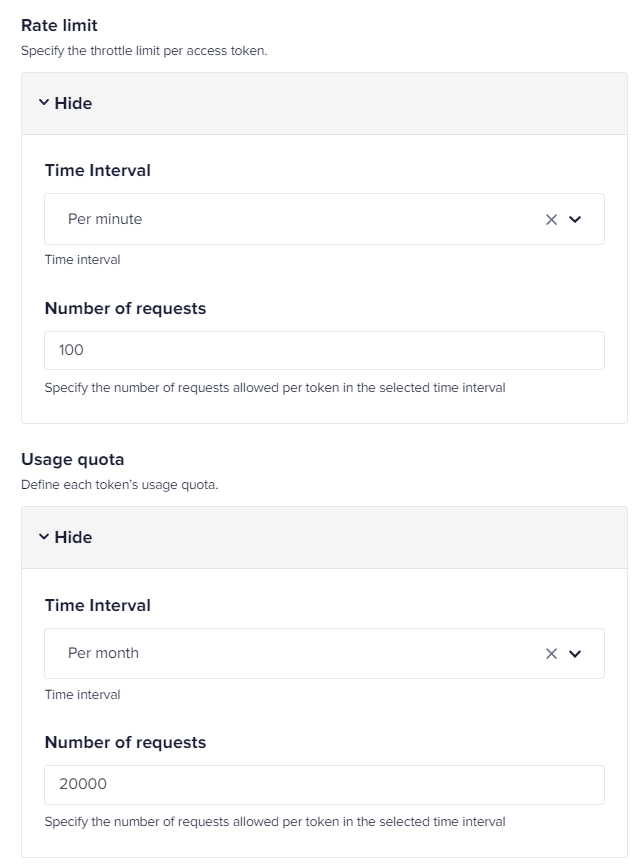
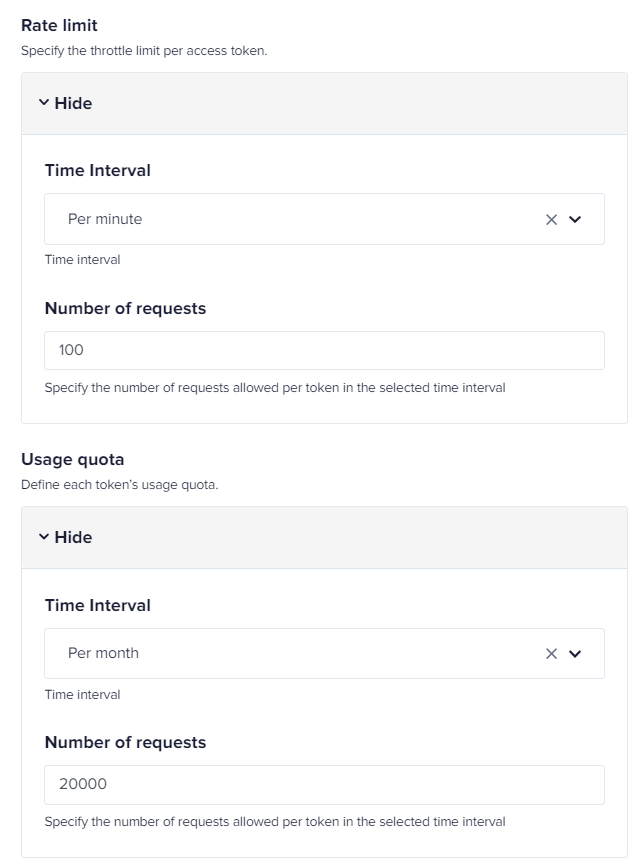
Rate limit: The limit you want to set for the access profile using which you want to call the API endpoint:
-
Time Interval: The maximum time interval for the access token. E.g., Per minute.
Number of requests: A total number of API calls to be triggered using the token within the specified time interval. E.g., 100.
The above-specified inputs mean, 100 times the API endpoint can be requested per minute. It can be set to days and months. -
Usage quota: The number of times the client is allowed to use the API endpoint within the specified time duration.
Time Interval: The maximum time interval for the client to use the API endpoint. E.g., Per month.
Number of requests: A total number of API requests a client can make in specified time duration. E.g., 20000.
The above-specified inputs mean, 20000 times the client can request for the API endpoint per month. It can be set to a year.
- IP Whitelist: The IP(s) through which the API calls should be made using the endpoint. For example, if 172.217. 22.14 is the IP specified here, then API requests from this IP are accepted. Rest all the IPs are blocked for trying to request the API endpoint.
Click the Submit button. You’ll get the API key as highlighted:

Figure 13: Access profile created
This window also displays limits set for the API key and API endpoint usage and the name of the API collections for which the access profile has been created.
Executing the created API
Copy the API key and go back to your API Development tool to test the created API
Select the method, i.e. Get and paste the API. Now, go to the Headers section. Specify apiKey under the KEY field and paste the API key value obtained under the VALUE field:
Now, click the Send button. You’ll get the response of the callable journey in the API Development tool exactly equal to the response obtained in Gupshup integration platform:
Sharing the API
It is possible to share the API with other users or customers. Simply share the endpoint and the API key generated in the access profile of the Clients window. Ensure that rate limit and usage quota are appropriately configured with proper whitelisting of IP addresses.
Updated 3 months ago
