Set Up Gupshup WhatsApp Account
To send WhatsApp messages via Gupshup, you need to set up your Gupshup WhatsApp Business account in Salesforce Marketing Cloud. Follow these steps:
- Create a New Journey:
- Start by creating a new journey in Journey Builder. Follow these steps:
- Click on Create New Journey to initiate the process.
- Build a Multi-Step Journey:
- Under the new journey, click Build under Multi-Step Journey. This allows you to create a multi-step journey that includes WhatsApp Template Messages.
- Configure Entry Source:
- Drag and drop your chosen entry source onto the canvas. You can use either a Data Extension or API Event as your entry source.
- Configure Entry Source Details:
- Click on the Data extension entry source you added to the canvas.
- Click on Summary.
- Click Done to confirm and save your entry source configuration.
- Add Gupshup WhatsApp Message Integration Activity:
- Drag and drop the WhatsApp Messaging By Gupshup custom activity onto the canvas.
- Configure Gupshup WhatsApp Message Integration Activity:
- Click on the WhatsApp Messaging By Gupshup custom activity to configure it.
- Add an activity name and description to help identify it within the journey.
- Configure Gupshup WhatsApp Channel:
- After clicking WhatsApp Messaging By Gupshup custom activity, a popup window will appear with two tabs: Template Messaging and Channel Configuration. If your channel is not yet configured, you will be directed to the Channel Configuration screen.
- In this documentation, we'll focus on the Channel Configuration tab.
- Click on the Channel Configuration tab to continue configuring your Gupshup WhatsApp Business account.
Don't have a Gupshup Account yet?
Get Started today: https://www.gupshup.io/contact-us
Configure a Gupshup Enterprise / Console Enterprise Account
To set up your Gupshup WhatsApp Business account or Console Enterprise Account for integration, follow these steps:
If you have a Gupshup WhatsApp Business account, please enter the following details and click submit button to save configuration. You need to choose the "Enterprise" tab for configuring the integration.
- Channel Name: Assign a unique name for your account to identify it.
- HSM Account ID: Enter the HSM (Highly Structured Message) Account ID that the Gupshup team shared with you via email during the account activation process.
- Password: Use the HSM Account Password provided by the Gupshup team in the activation email.
- WhatsApp Business No: Ensure that you have a Verified Business Phone Number linked to your account. This verified number is necessary for testing and sending messages.
Save Configuration:
After entering the required information, click the "Submit" button to save the configuration.
Video Tutorial
Configure Gupshup Self-Serve / Console Self-Serve Account
If you have a Gupshup Self-Serve or Console account, please enter the following details and click submit button to save configuration. You need to choose the "Self-Serve" tab for configuring the integration.
Following details are needed to configure the extension to use a Self-Serve account
- App Name
- App ID
- API Key
- Country Code
- WhatsApp Business Number
In case you are facing trouble in retrieving these details, please follow the documentation below:- Console Self-Serve Accounts: https://docs.gupshup.io/docs/configure-console-self-serve-integration
- Self-Serve Account: https://docs.gupshup.io/docs/configure-self-serve-integration
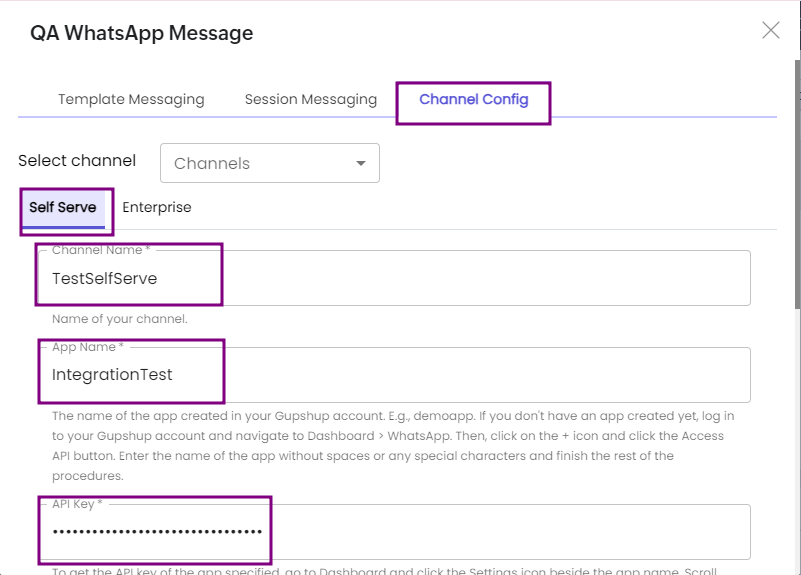
Self-Serve Channel Configuration
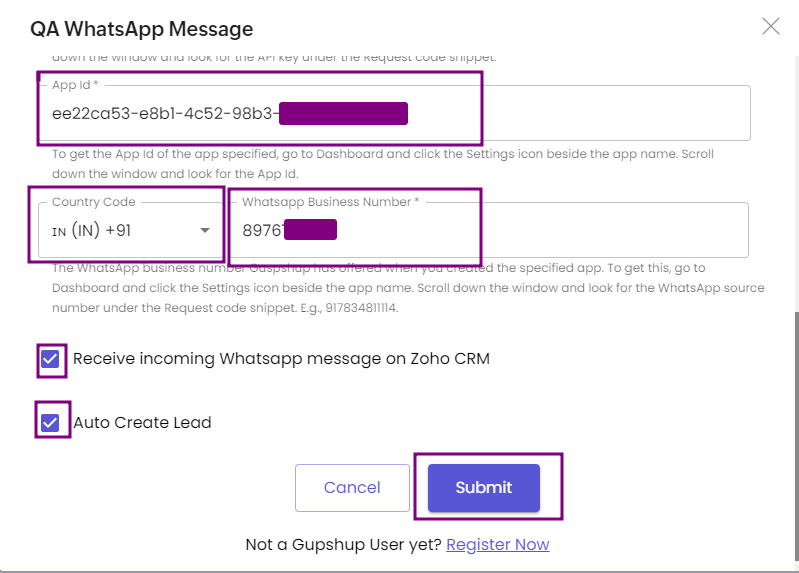
Self-Serve Channel Configuration
Updated 9 months ago