Step 2: Setup Configuration
To configure the setup for your Salesforce app, including creating CSP Trusted Sites, setting the page layout, configuring page layout settings for campaigns, and managing permission sets, follow the steps below:
1. Create CSP Trusted Sites
The Lightning Component framework uses Content Security Policy (CSP) to impose restrictions on content.
- To create CSP Trusted Sites in Salesforce, please follow these steps:
- Click on the gear icon located in the top-right corner and select "Setup" from the dropdown menu.
- In the search bar, type "My Domain" and select "My Domain" from the search results.
- Copy Current My Domain URL

My Domain
- In the search bar, type "CSP" and select "Content Security Policy" from the search results.
- Click on "Trusted Sites" under the "Content Security Policy" section.
- On the Trusted Sites page, click on the "New Trusted Site" button.
- Fill in the required information for the CSP Trusted Site:
- Trusted Site Name: Provide a descriptive name for the trusted site.
- Trusted Site URL: Enter the URL copied in the above step .
- Active: Check the box to activate the CSP Trusted Site.
- Select all the directives under CSP Directives
- Optionally, you can specify additional settings such as CSP Trusted Site Type or enforce specific Content Security Policies.
- Click on the "Save" button to create the CSP Trusted Site.
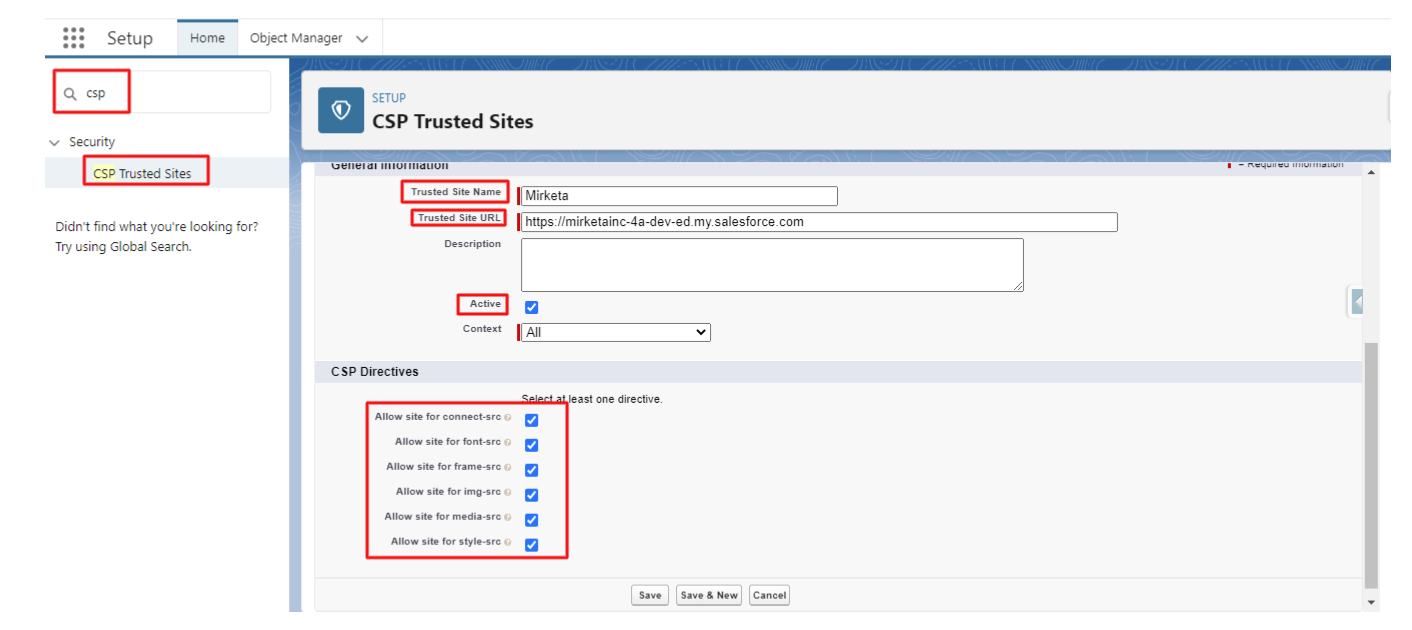
CSP Trusted Sites
- Similarly create a second new CSP Trusted Site in Salesforce
- Fill in the required information for the CSP Trusted Site:
- Trusted Site Name: Provide a descriptive name for the trusted site.
- Trusted Site URL: https://wsv2-iebhnubbya-el.a.run.app
- Active: Check the box to activate the CSP Trusted Site.
- Select all the directives under CSP Directives
- Optionally, you can specify additional settings such as CSP Trusted Site Type or enforce specific Content Security Policies.
- Click on the "Save" button to create the CSP Trusted Site.
- Fill in the required information for the CSP Trusted Site:
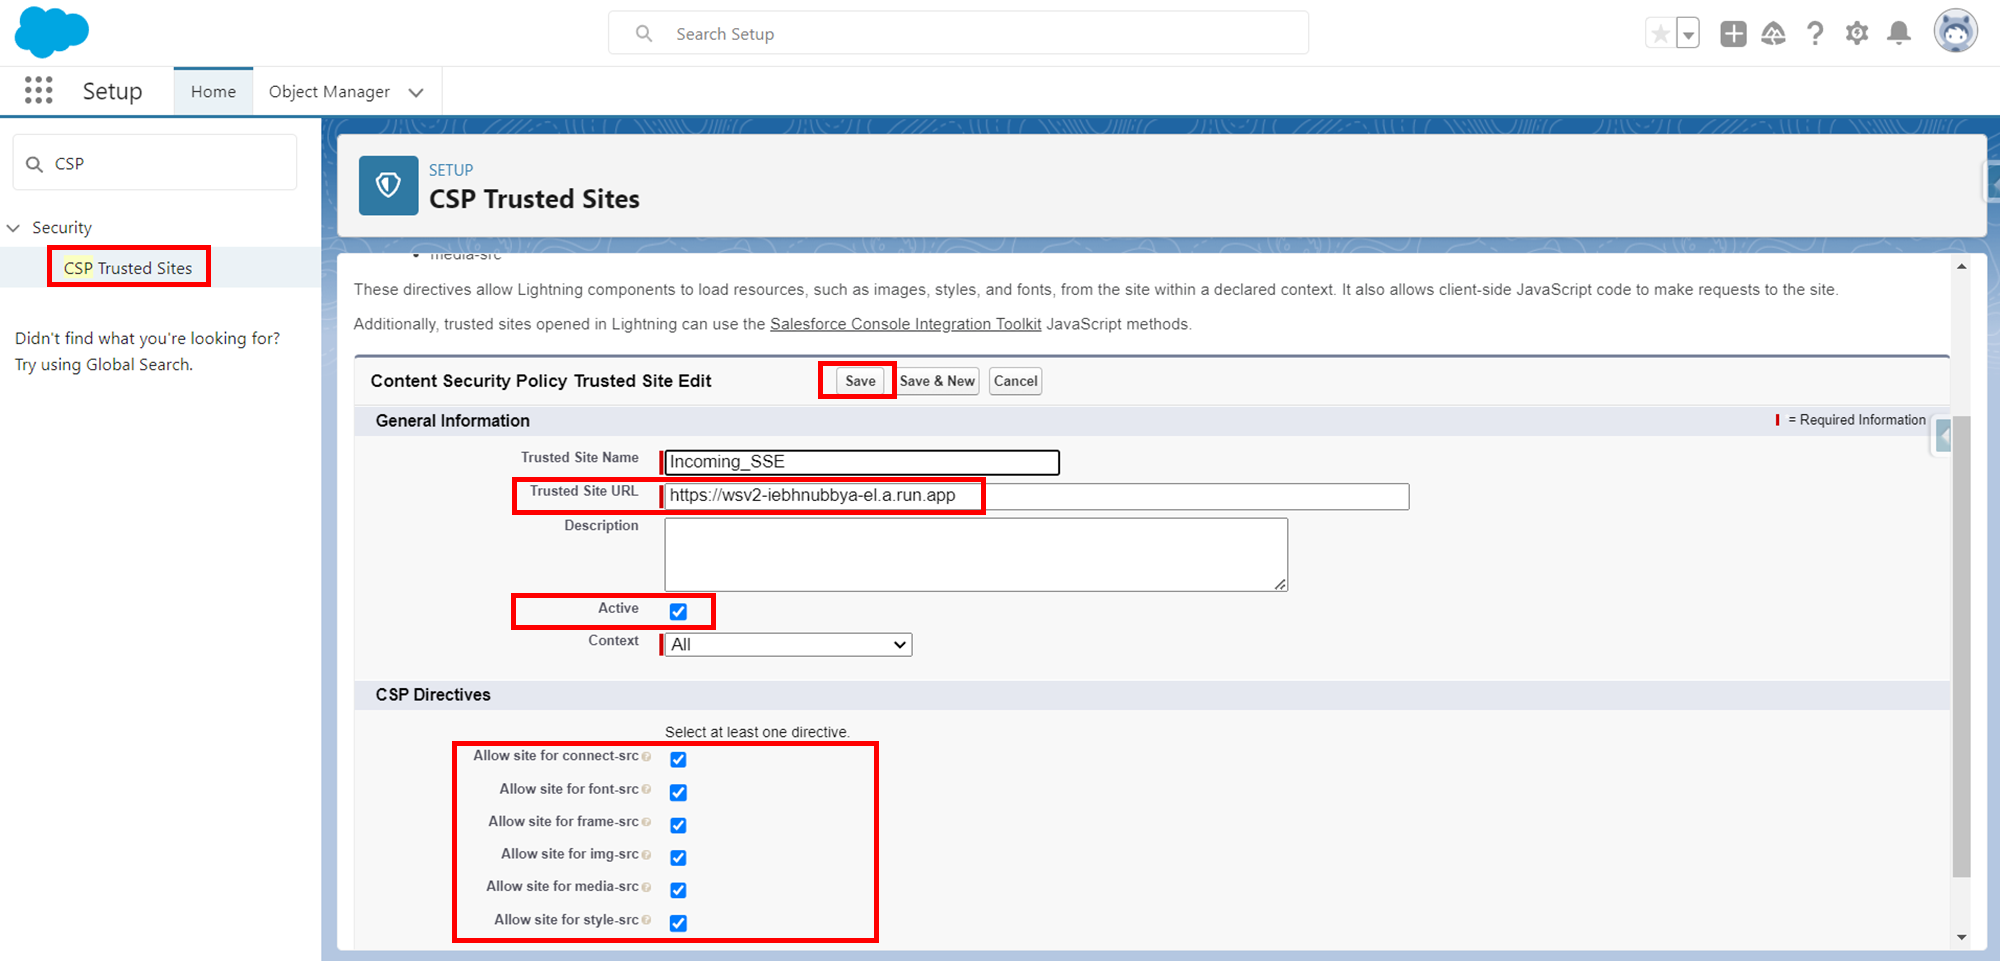
CSP Trusted Sites
2. Setting the Page Layout
To set the page layout in Salesforce, follow these steps:
for all the objects (Lead, Contact, Account, Opportunity, Campaign, Case)
2.1 Adding WhatsApp history Component to the Object Record Page
To add the WhatsApp history component to the record page of the "Lead" object in Salesforce, follow these steps:
- Go to the Salesforce setup by clicking on the gear icon located in the top-right corner and selecting "Setup" from the dropdown menu.
- In the setup menu, search for "Object Manager" and click on it.
- Select the "Lead" object from the list of objects.
- Under the "Lead" object, click on "Lightning Record Pages".
- Locate the Gupshup Lead Record Page and click on it to open the page editor.
- In the page editor, find the section or location where you want to add the WhatsApp history component.
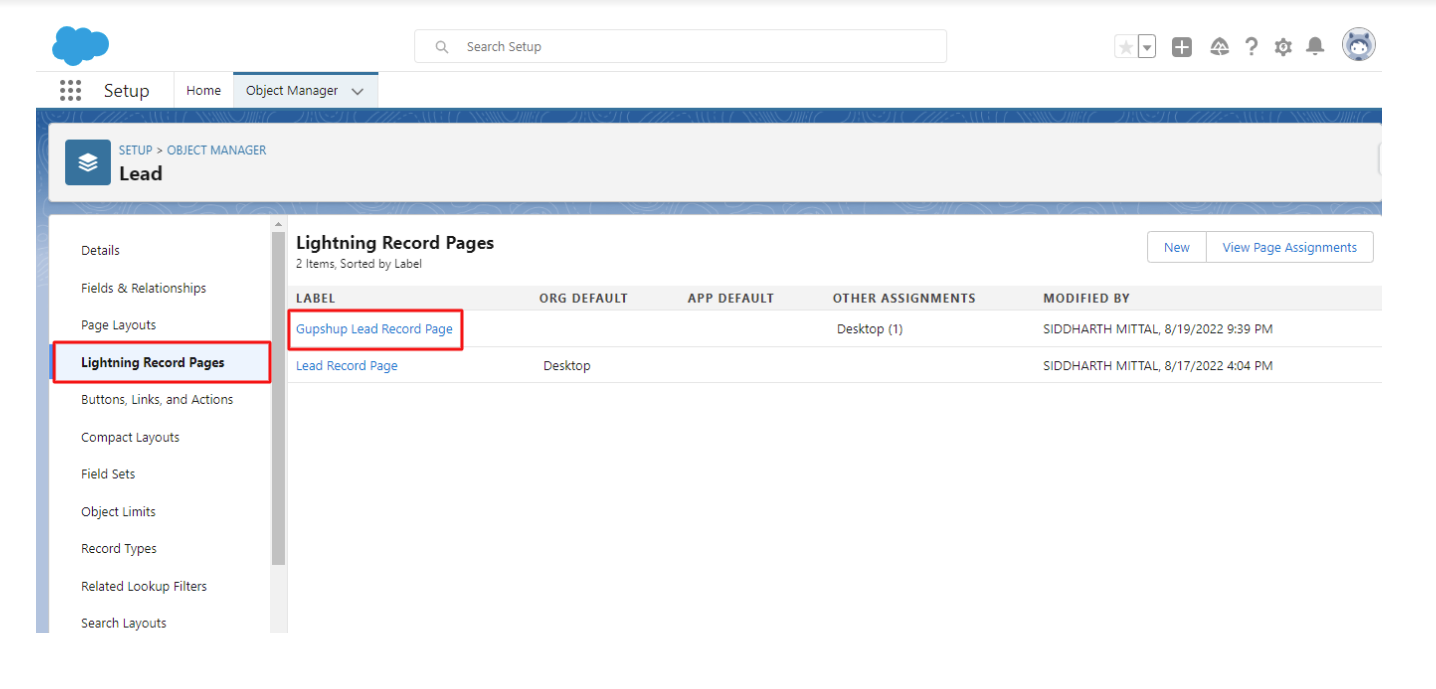
- Click on View Button to access the detailed view of the record.
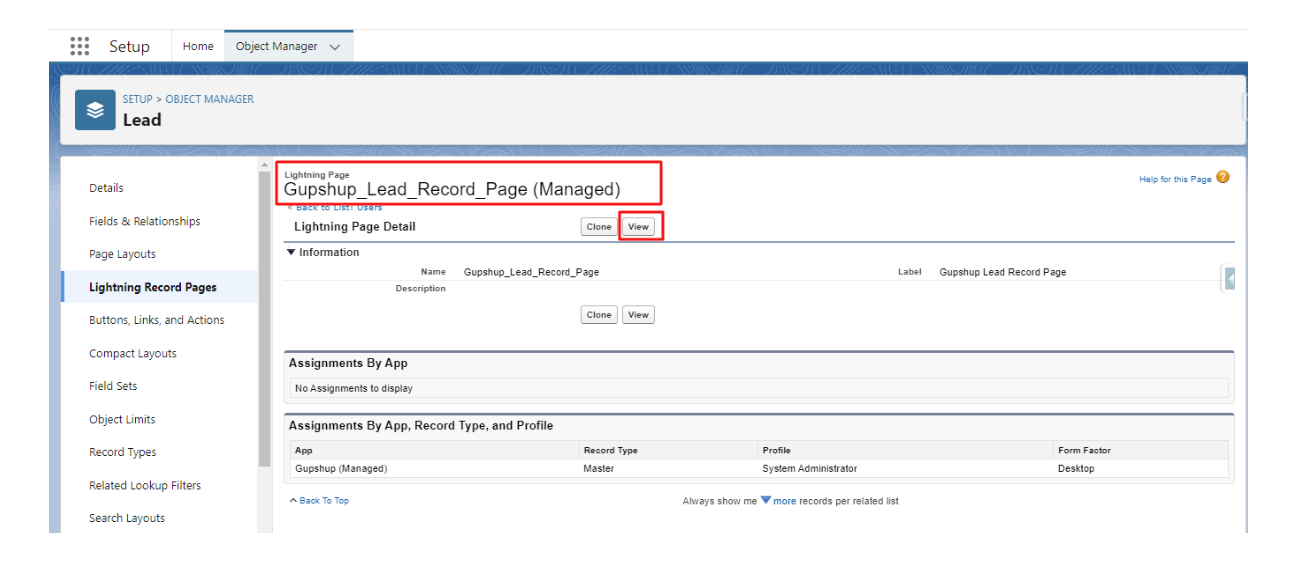
Lightning Record page detailed view
- After opening the Gupshup App in Salesforce, locate the "Activation" option.
- Click on the "Activation" option to proceed.
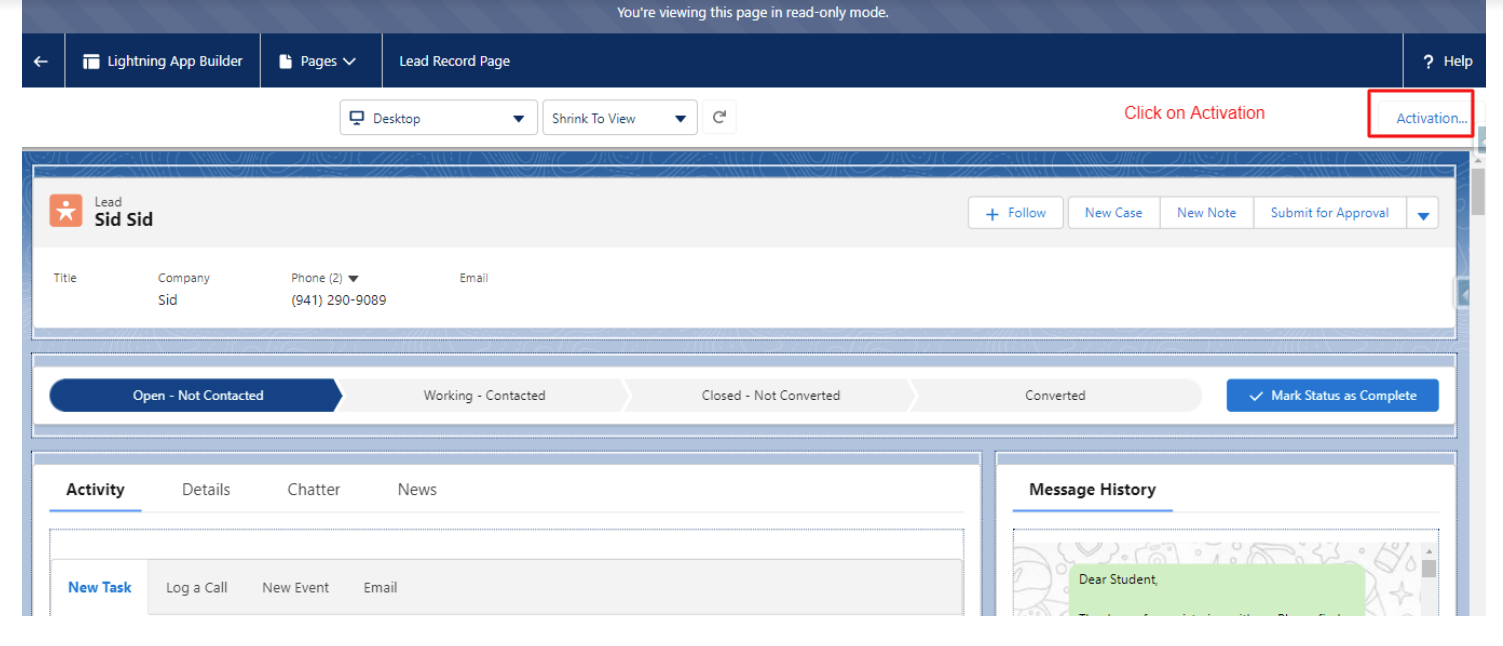
Activate
- Look for the "Assign to Apps, Record types, and Profiles" section.
- Click on the "Assign to Apps, Record types, and Profiles" option to continue.

- In the "Assign to Apps, Record types, and Profiles" page, locate the Gupshup App from the available options.
- Select the Gupshup App by clicking on it.

select gupshup app
-
Once you have selected the Gupshup App, click on the "Next" button to proceed.
-
In the "Select Form factor" page, choose the "Desktop" option from the available choices.
-
Select "Desktop" by clicking on it.

select form factor
-
After selecting "Desktop", click on the "Next" button to proceed.
-
On the "Profiles" page, select the desired profiles that should have access to the Gupshup App.
-
Choose the profiles by checking the corresponding checkboxes.

choose profiles
- Once you have selected the desired profiles, click on the "Save" button to save the changes.
2.2 Adding “Send WhatsApp Message” Button on detail page
To add the "Send WhatsApp Message" button on the detail page of the "Lead" object in Salesforce, follow these steps:
Let us take an example of a “Lead” and the same can be done for “Contact”, “Account” and “Opportunity” Objects.
- Go to the Salesforce setup by clicking on the gear icon located in the top-right corner and selecting "Setup" from the dropdown menu.
- In the setup menu, search for "Object Manager" and click on it.
- Select the "Lead" object from the list of objects.
- Under the "Lead" object, click on "Page Layouts".
- Click on "Page Layout Assignment" at the top-right corner of the page.
- Locate the desired page layout assignment and click on it to open the page layout editor for that assignment.

Adding “Send WhatsApp Message” Button on detail page
- In the "Page Layout Assignment" section, click on the "Edit Assignment" button.
- Locate the system admin user from the list of available users.
- In the "Layout Name" column for the system admin user, select "Gupshup Lead Layout" from the dropdown menu.

- Once you have selected "Gupshup Lead Layout" for the system admin user, click on the "Save" button to save the assignment.
3. Page Layout Setting for Campaign
To set the page layout for the Campaign object and add the "Send WhatsApp Message" button, follow these steps:
- Go to the Salesforce setup by clicking on the gear icon located in the top-right corner and selecting "Setup" from the dropdown menu.
- In the setup menu, search for "Object Manager" and click on it.
- Select the "Campaign" object from the list of objects.
- Under the "Campaign" object, click on "Page Layouts".
- Look for the page layout you want to edit and click on it to open the page layout editor.
- In the page layout editor, navigate to the "Mobile and Lightning Actions" section.
- Locate the "Send WhatsApp Message" button in the palette on the left-hand side.
- Drag and drop the "Send WhatsApp Message" button onto the desired location within the page layout.
- Arrange the button as needed by adjusting its position within the layout.
- Save the changes to the page layout.

Page layout for compains
4. Permission Sets
This Permission Set must be assigned to the Gupshup User or SFDC user who is responsible for managing the WhatsApp Channel Configurations. The User who is assigned with this permission set, will be able to create, edit and delete the WhatsApp Channel Configurations. Gupshup recommends using Permission Set assignment very judiciously as it provides control over key application configuration.
By following these steps, you can assign the "WA_Channel_Permission_Set" permission set to the specified user in Salesforce. This permission set grants access to create, edit, and delete the WhatsApp channel configurations. It is recommended to assign this permission set judiciously, as it provides control over important application configurations related to the WhatsApp channel.
To assign the "WA_Channel_Permission_Set" permission set to a specific user in Salesforce for managing the WhatsApp channel configurations, follow these steps:
Steps to Assign Permission Set:
- Go to the Salesforce setup by clicking on the gear icon located in the top-right corner and selecting "Setup" from the dropdown menu.
- In the setup menu, search for "Users" and click on it to access the user settings.
- Search for and select the specific user to whom you want to assign the permission set.
- Hover over the "Permission Set Assignment" related list on the user detail page and click on "Edit Assignment".
- In the "Permission Set Assignment" editor, click on the "Add Permission Set" button.
- Select the "WA_Channel_Permission_Set" from the list of available permission sets.
- Click on the "Save" button to assign the permission set to the user.
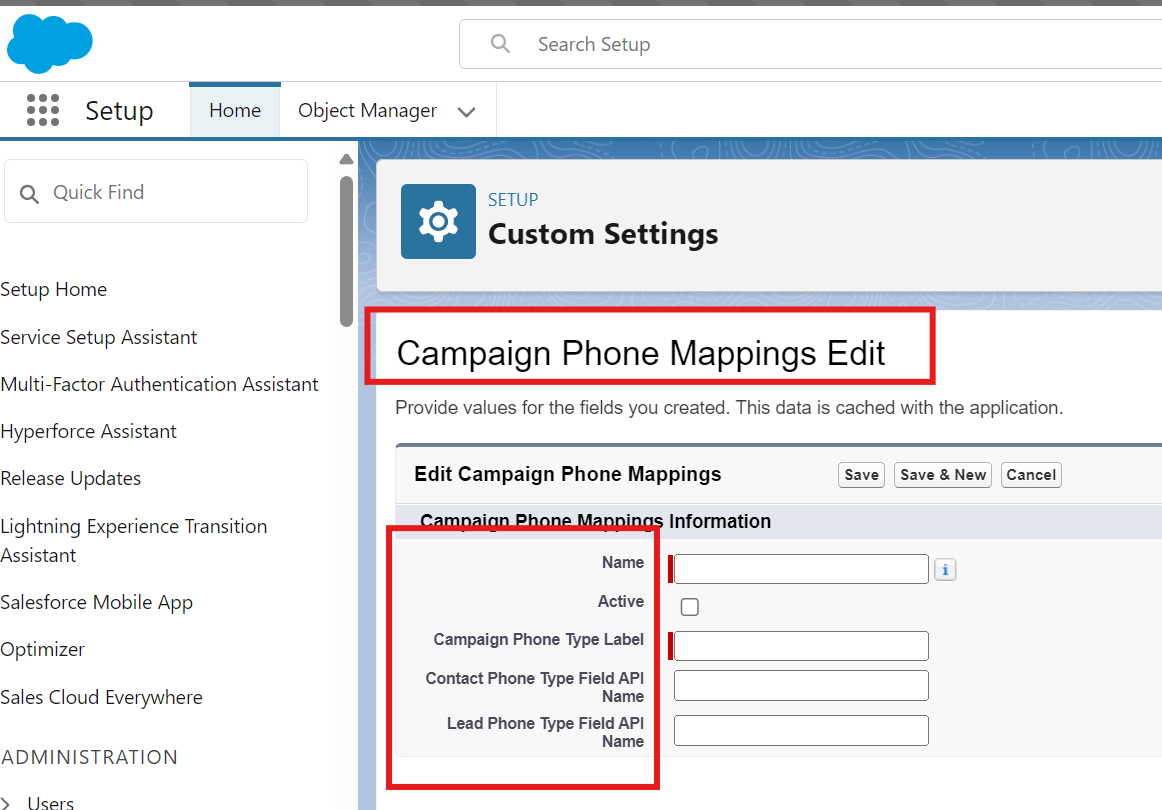
5. Create records in campaign phone mapping
To create records in campaign phone mapping in Salesforce, please follow these steps:
- Click on the gear icon located in the top-right corner and select "Setup" from the
dropdown menu. - In the search bar, type "custom settings" and select " campaign phone mapping "
from the search results.
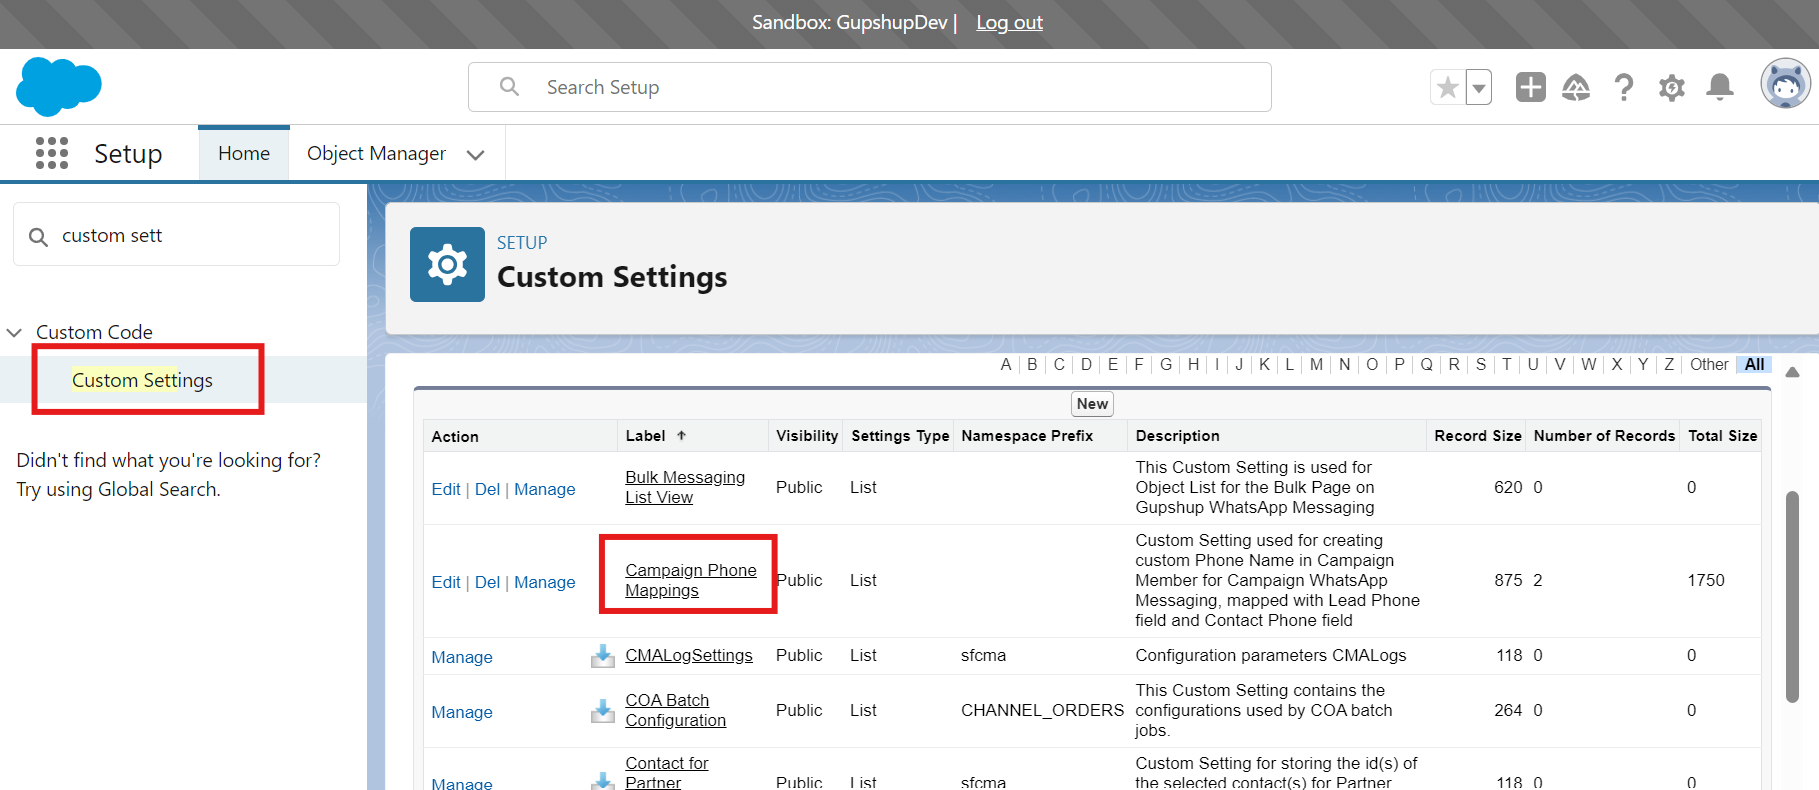
Custom settings
- Click on campaign phone mapping and then click on manage.
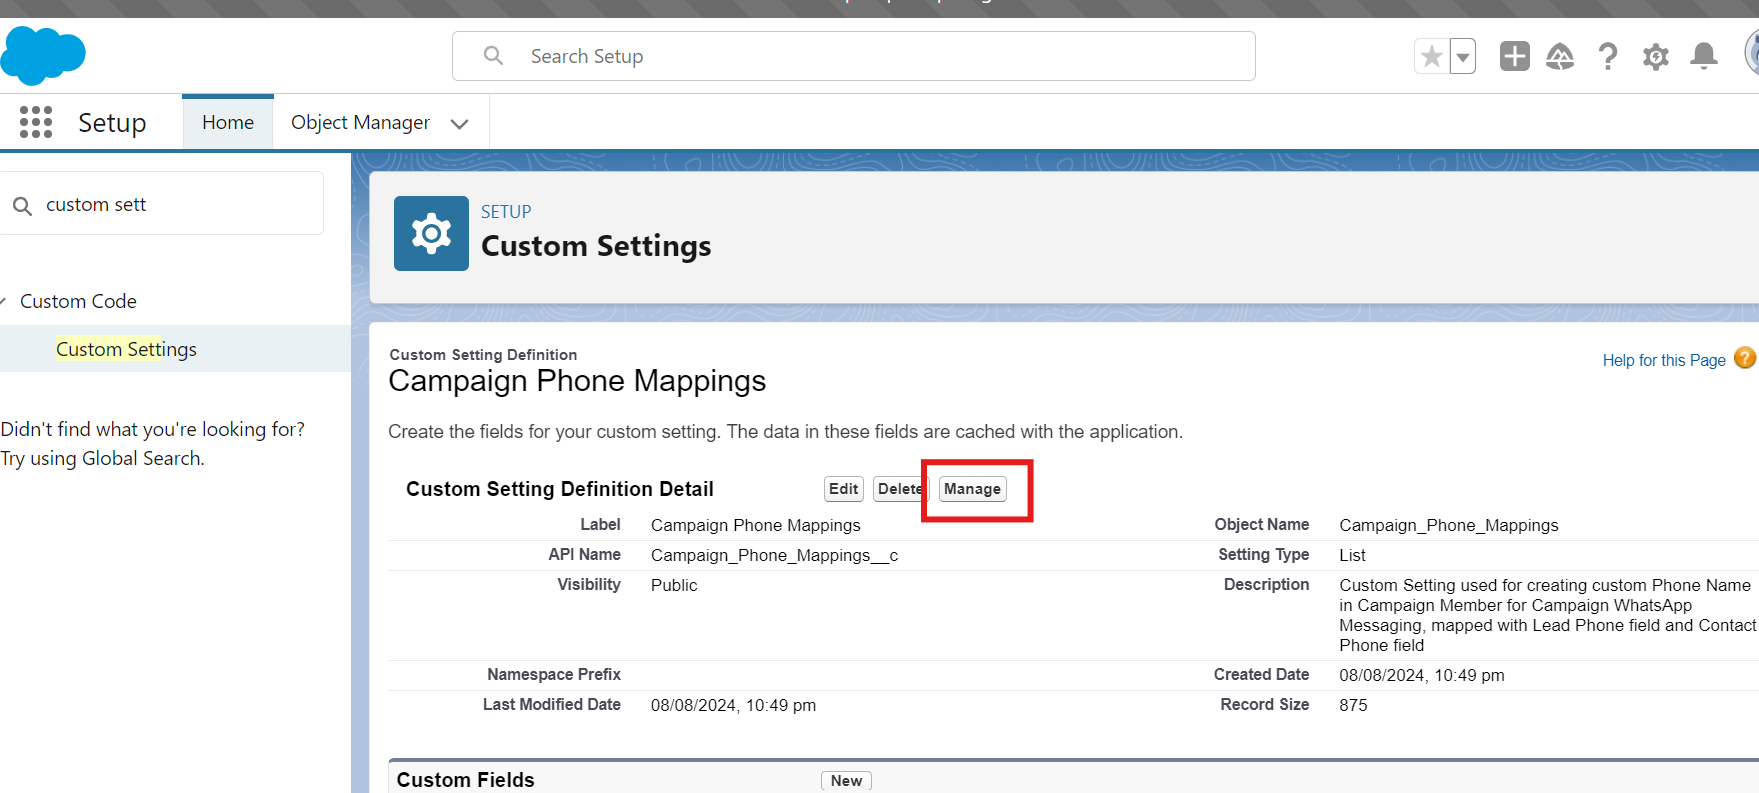
manage custom settings
- After clicking on manage select the new button
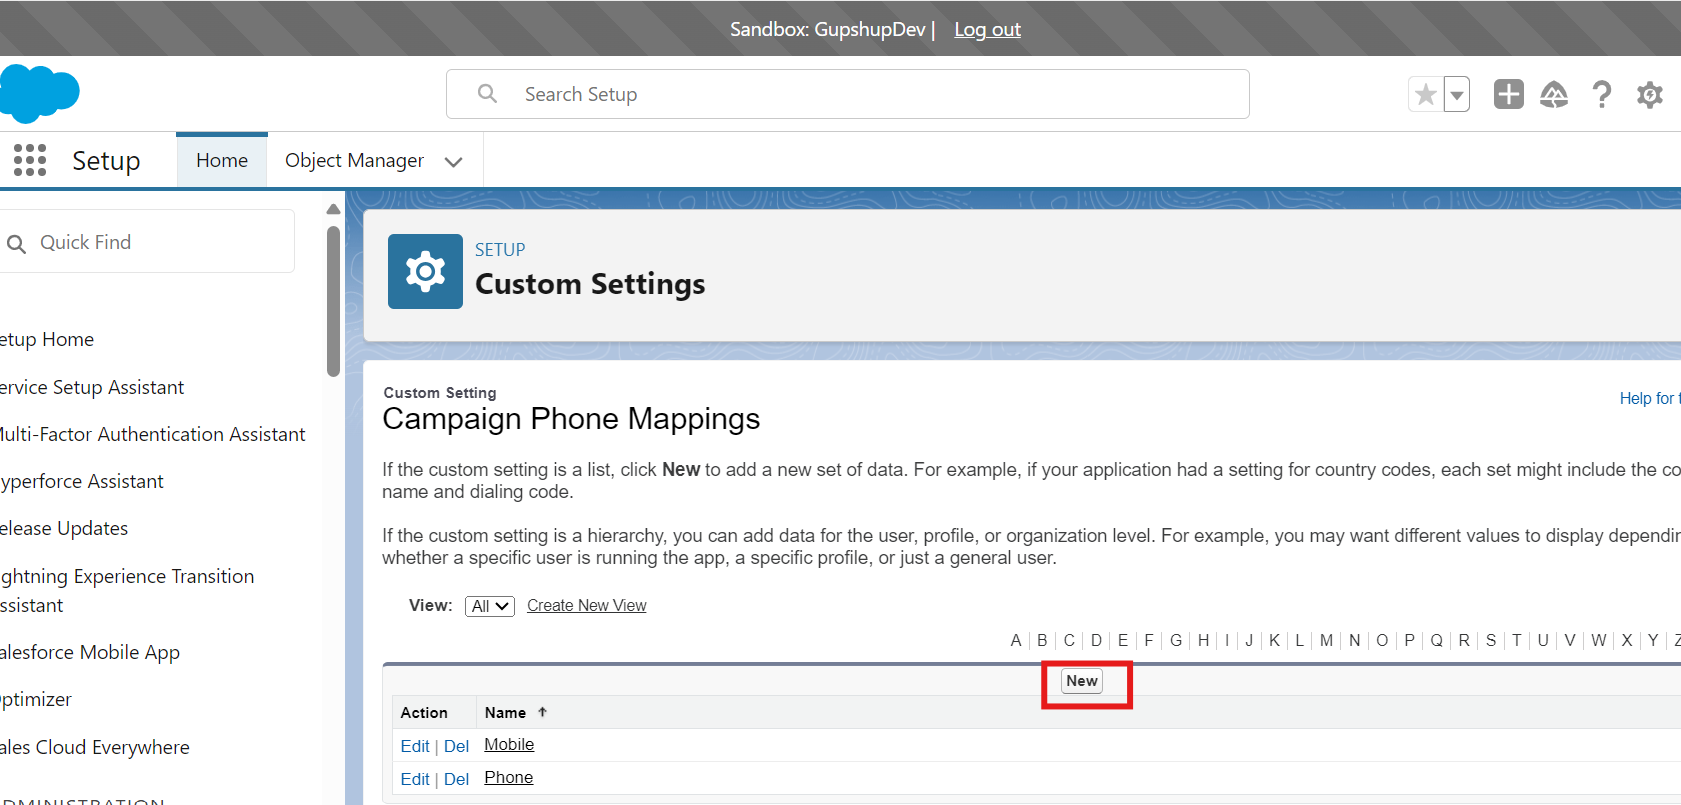
Add new dataset
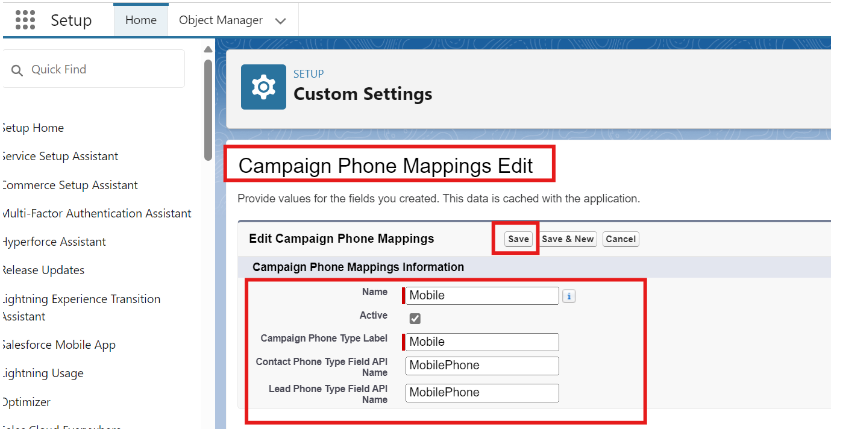
- Fill in the required information for the campaign phone mapping records created:

Campaign Phone Mappings edit
○ Name: Mobile
○ Active: Check the box to activate the campaign phone mapping.
○ Campaign phone type label: “Mobile”
○ Contact phone type field API Name: MobilePhone
○ Lead phone type field API Name: MobilePhone
- Click on “Save” button to create campaign phone mapping record.
Save campaign phone mapping record
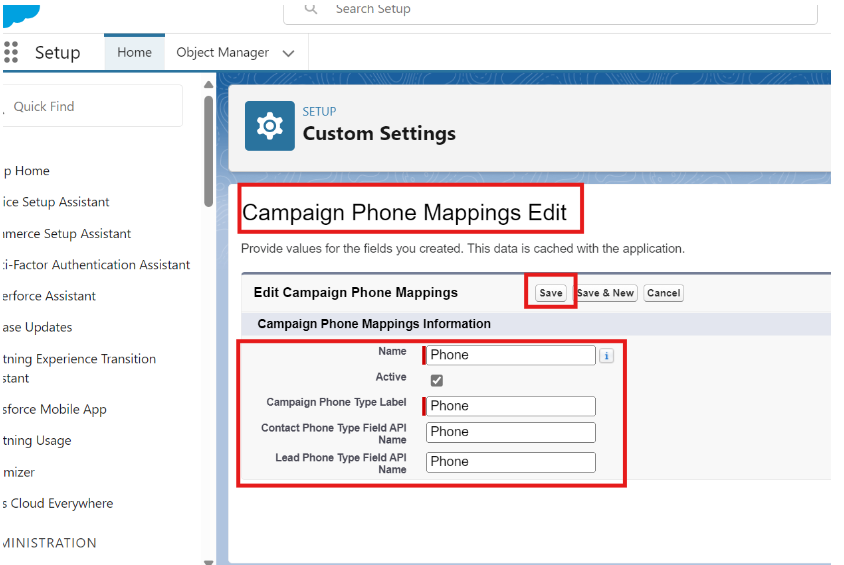
- Similarly create a second new campaign phone mapping record:
campaign phone mappings edit
○ Name: Phone
○ Active: Check the box to activate the campaign phone mapping.
○ Campaign phone type label: Phone
○ Contact phone type field API Name: Phone
○ Lead phone type field API Name: Phone
- Click on “Save” button to create campaign phone mapping record
Save campaign phone mapping record
To Enable Auto Lead Creation
To streamline lead generation from incoming WhatsApp messages using Gupshup, you'll configure Salesforce to automatically create leads from WhatsApp numbers that do not already exist in your Salesforce database. This involves setting up a queue for lead management and creating a lead assignment rule to automate the lead creation process.
Create Queue
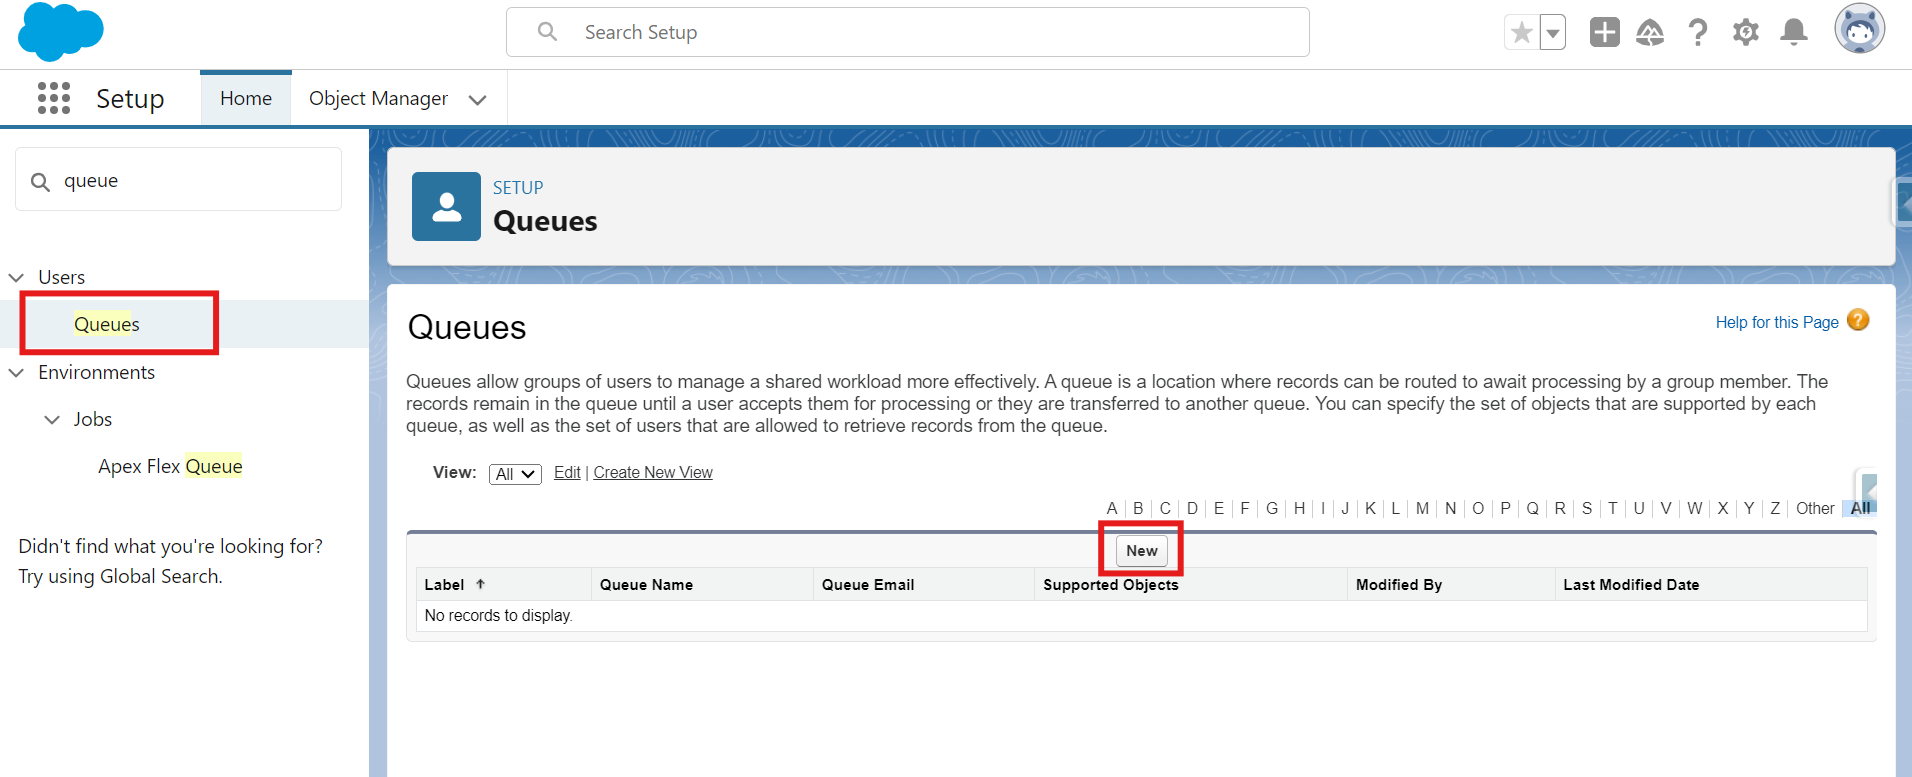
To create records in Queue in Salesforce, please follow these steps:
-
Navigate to Setup:
- Click on the gear icon in the top-right corner of Salesforce and select "Setup" from the dropdown menu.
-
Create a New Queue:
- In the Quick Find box on the left, type "Queues".
- Select "Queues" from the search results.
- Click on the "New" button.
Create Queue
-
Fill in the required information for the Queue record created:
- Label: Enter Gupshup WhatsApp Lead Assignment
- Queue Name : Enter Gupshup_WhatsApp_Lead_Assignment
- Supported Objects: Check the box for Leads to ensure that this queue will handle lead records.
- Selected Members: Add the Salesforce users or groups who will be responsible for managing leads in this queue.
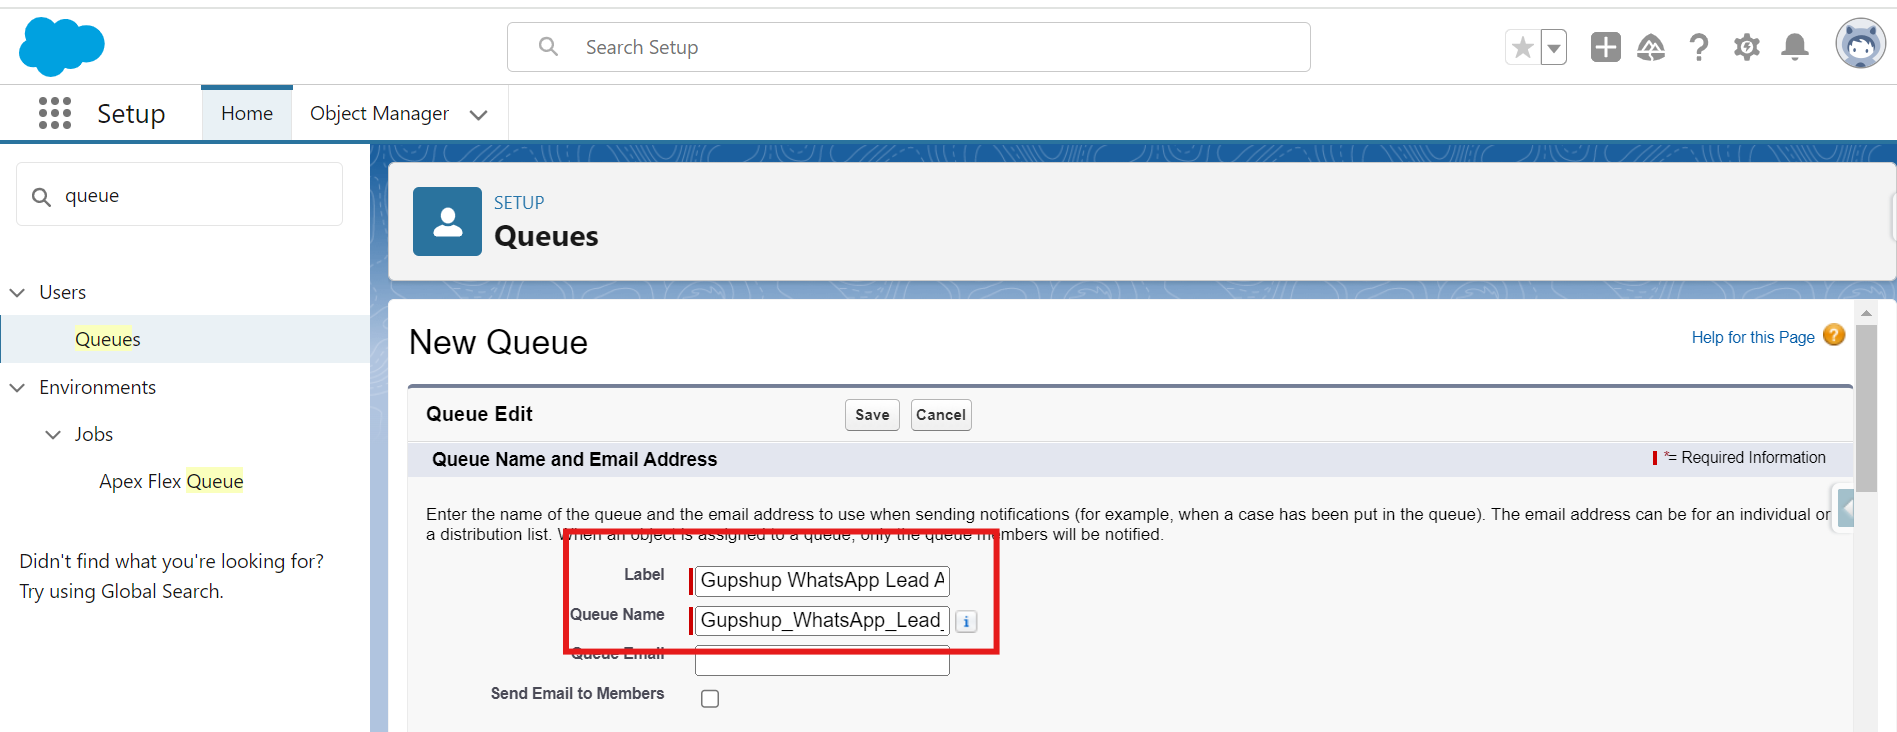
new queue
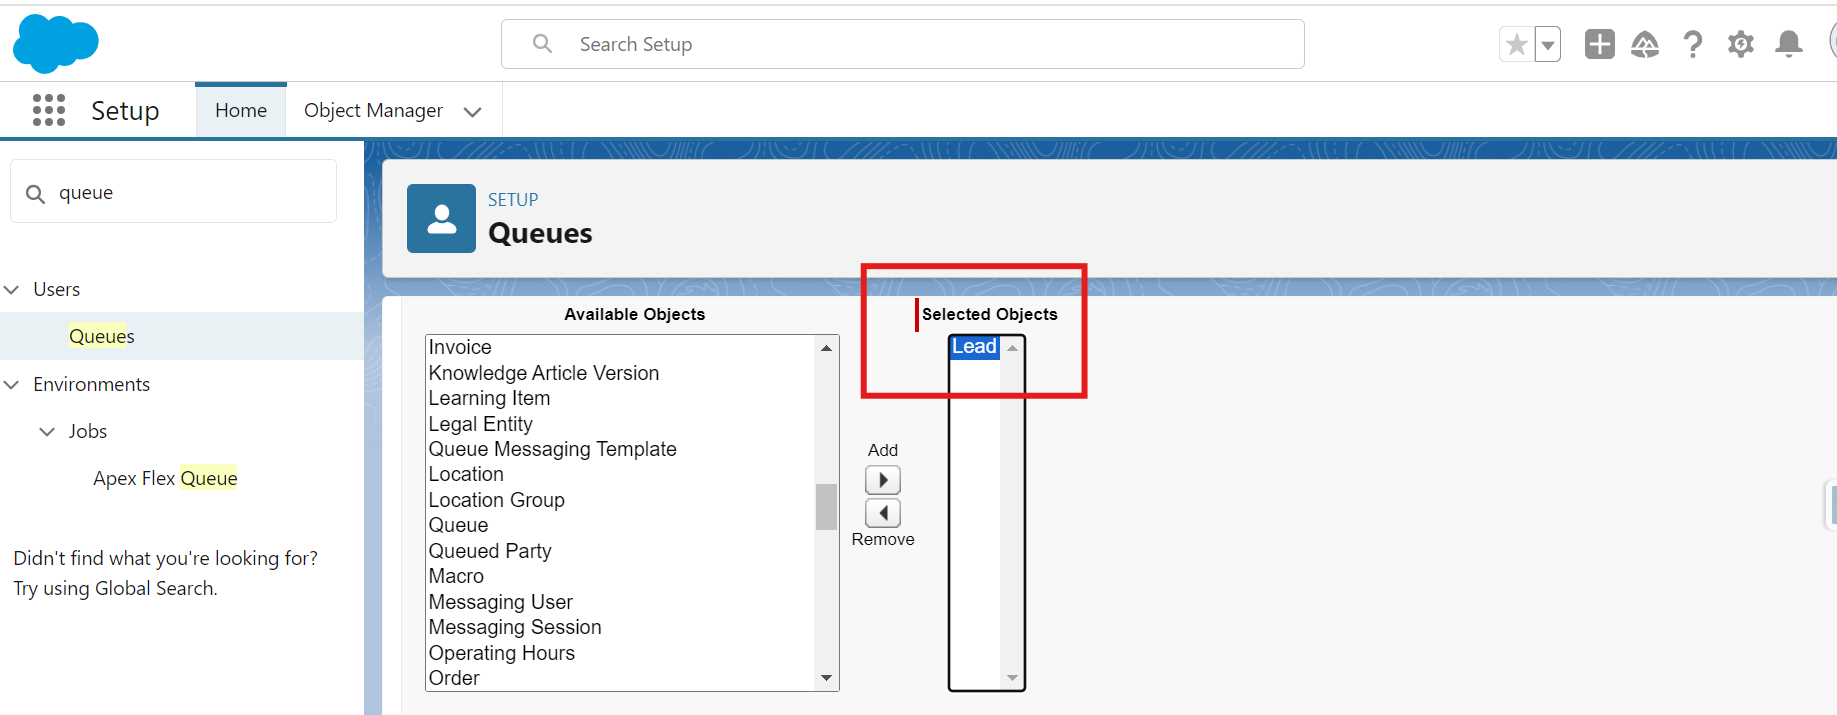
Selected Object - Lead
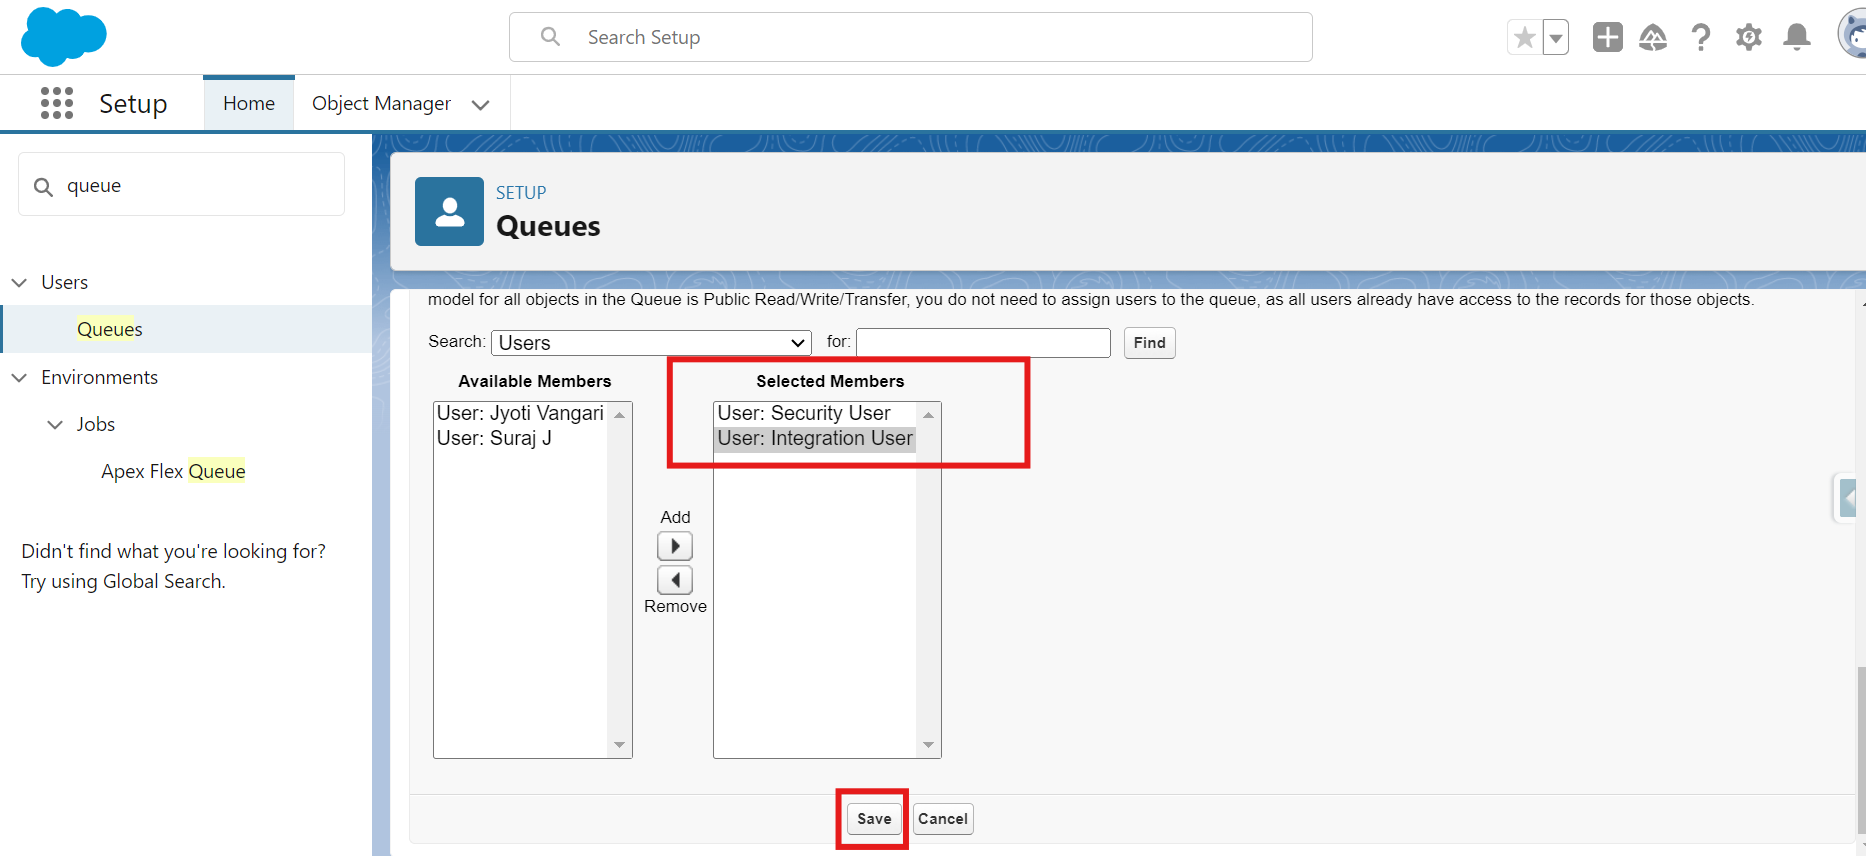
Selected members
-
Click the "Save" button to create and finalize the queue setup.
Adding a Lead Source Field Value
- Access Salesforce Setup:
- Click on the gear icon in the top-right corner of Salesforce.
- Select "Setup" from the dropdown menu to open the Setup page.
- Navigate to Object Manager:
- In the Quick Find box on the left side of the Setup page, type "Object Manager".
- Click on "Object Manager" to open the Object Manager section.
- Select the Lead Object:
- In the Object Manager, scroll through the list or use the search bar to find and select the "Lead" object.
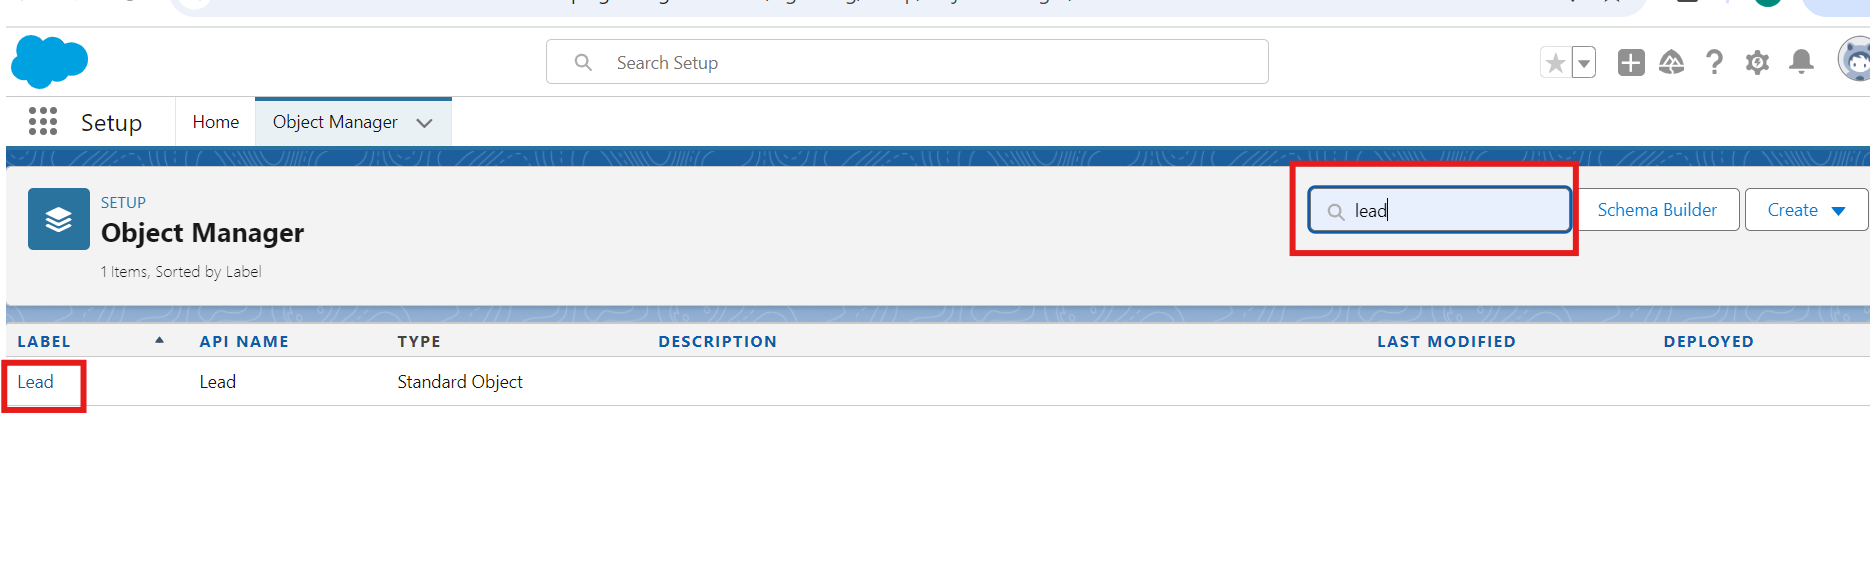
Lead Object Manager
- Access Fields & Relationships:
- Once in the Lead object settings, click on "Fields & Relationships" in the left-hand sidebar. This will show you a list of all fields associated with the Lead object.
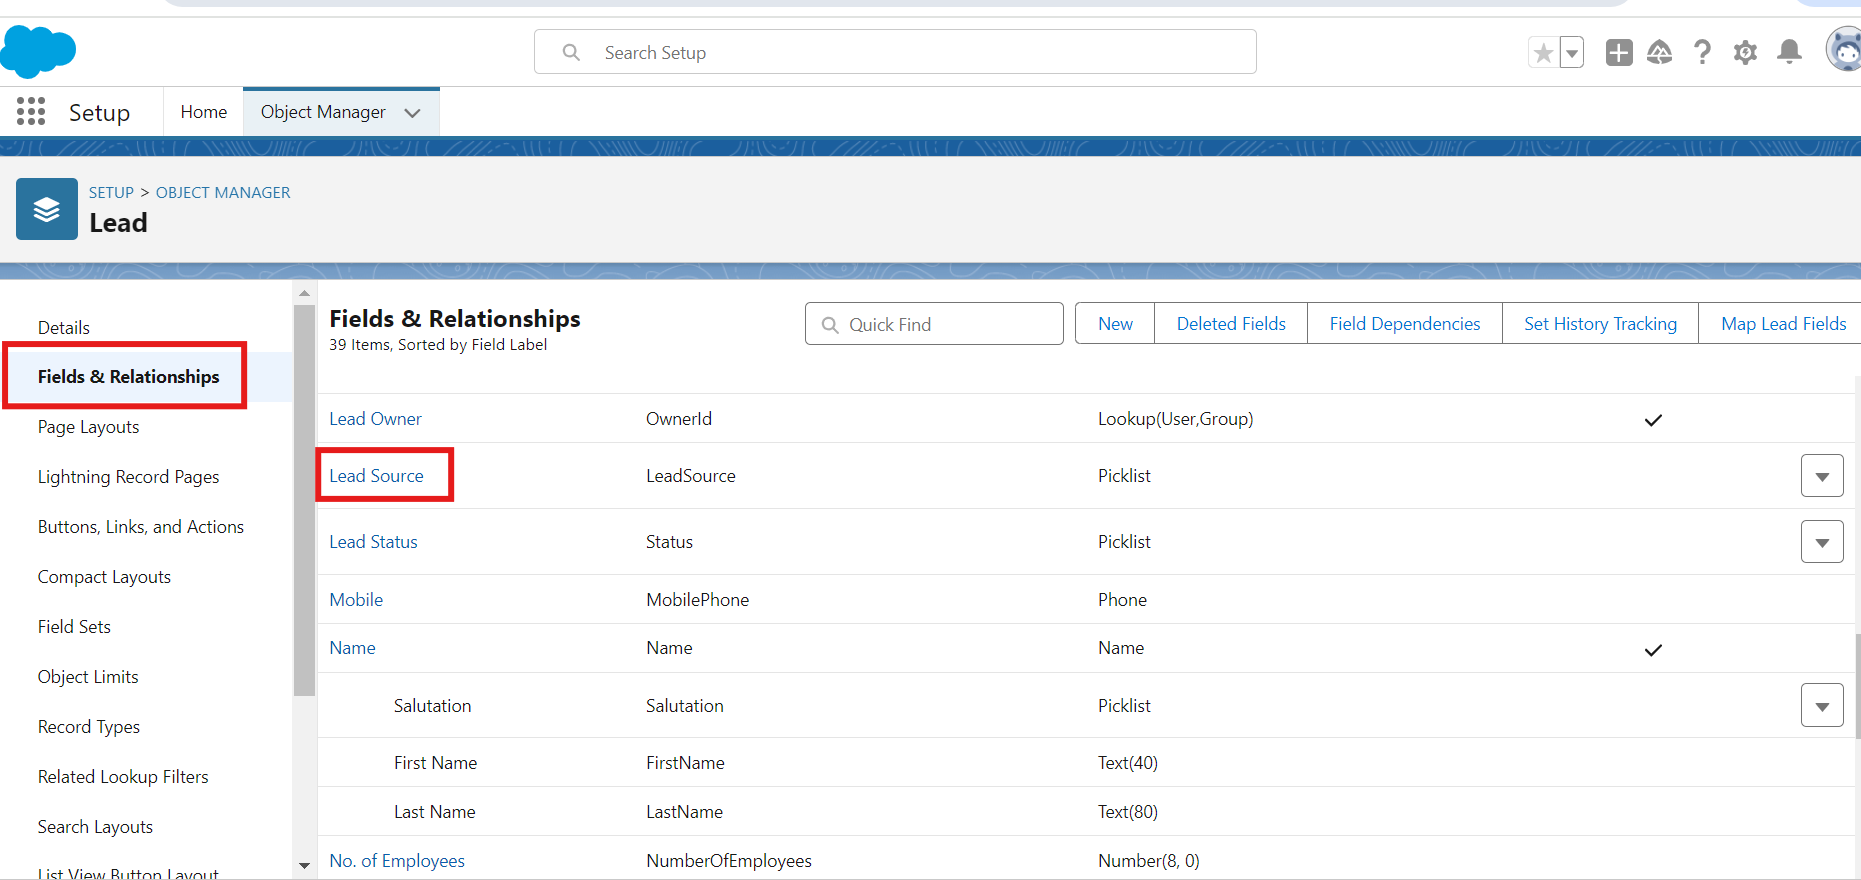
Fields & Relationships
- Find and Modify the Lead Source Field:
- Find and select the "Lead Source" field from the list of fields. This field is used to track the source of the lead.
- Picklist Values:
- On the Lead Source field detail page, look for the section titled "Picklist Values". This section lists all current values available in the picklist for this field.
- Click on the "New" button to add a new picklist value.

- Add New Picklist Value:
- In the new picklist value form, fill in the required information:
- Value: Enter "Gupshup WhatsApp" as the new picklist value. This will be the new option available for selection in the Lead Source field.
- In the new picklist value form, fill in the required information:
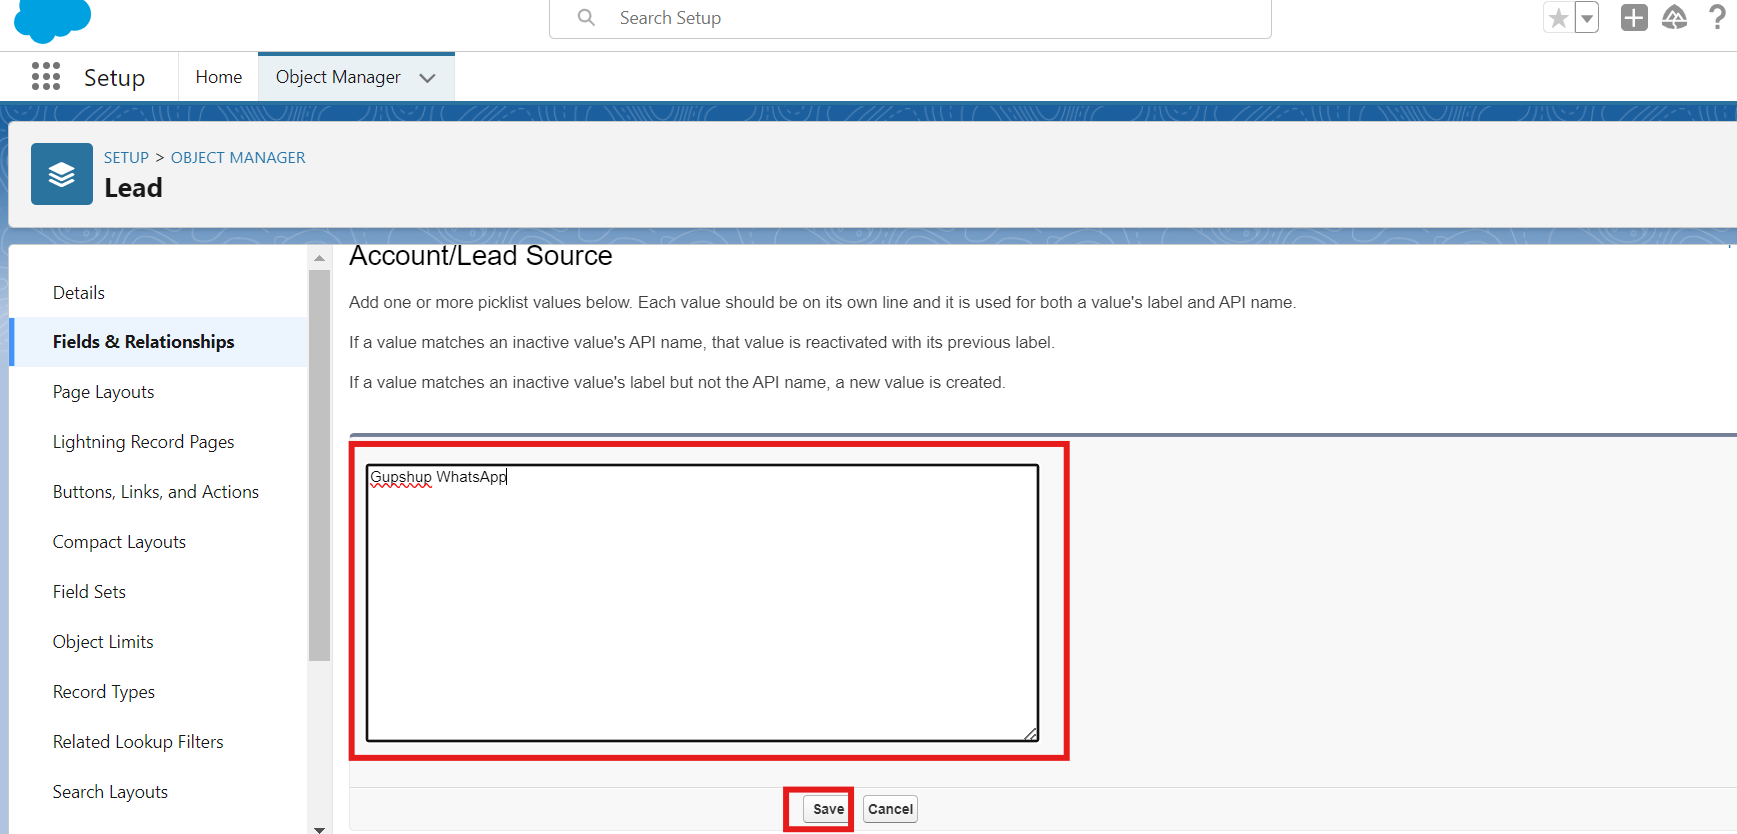
Add New Picklist value
- Save the New Value:
- Click the "Save" button to create and add the new value to the Lead Source field.
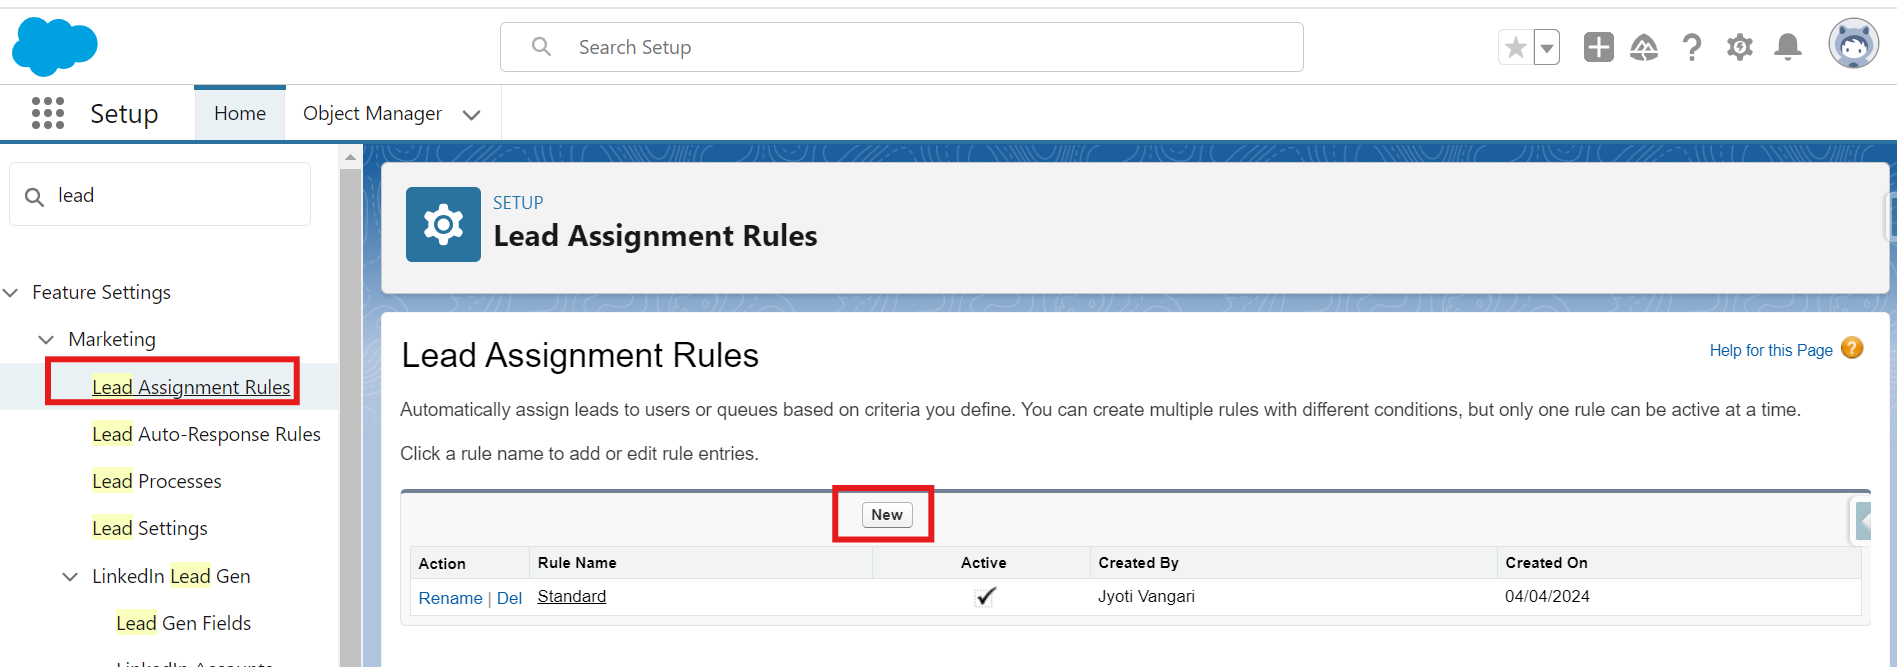
Create a Lead Assignment Rule
Lead Assignment Rules in Salesforce help you automatically assign new leads to users or queues based on specified criteria. Here's how to create a Lead Assignment Rule and configure it to use the queue for leads generated from Gupshup WhatsApp messages:
-
Access Salesforce Setup:
- Click on the gear icon in the top-right corner of Salesforce and select "Setup" from the dropdown menu.
-
Navigate to Lead Assignment Rules:
- In the Quick Find box on the left side of the Setup page, type "Lead Assignment Rules".
- Select "Lead Assignment Rules" from the search results.
-
Create a New Rule:
- Click on the "New Rule" button to create a new lead assignment rule.
Lead Assignment Rule
-
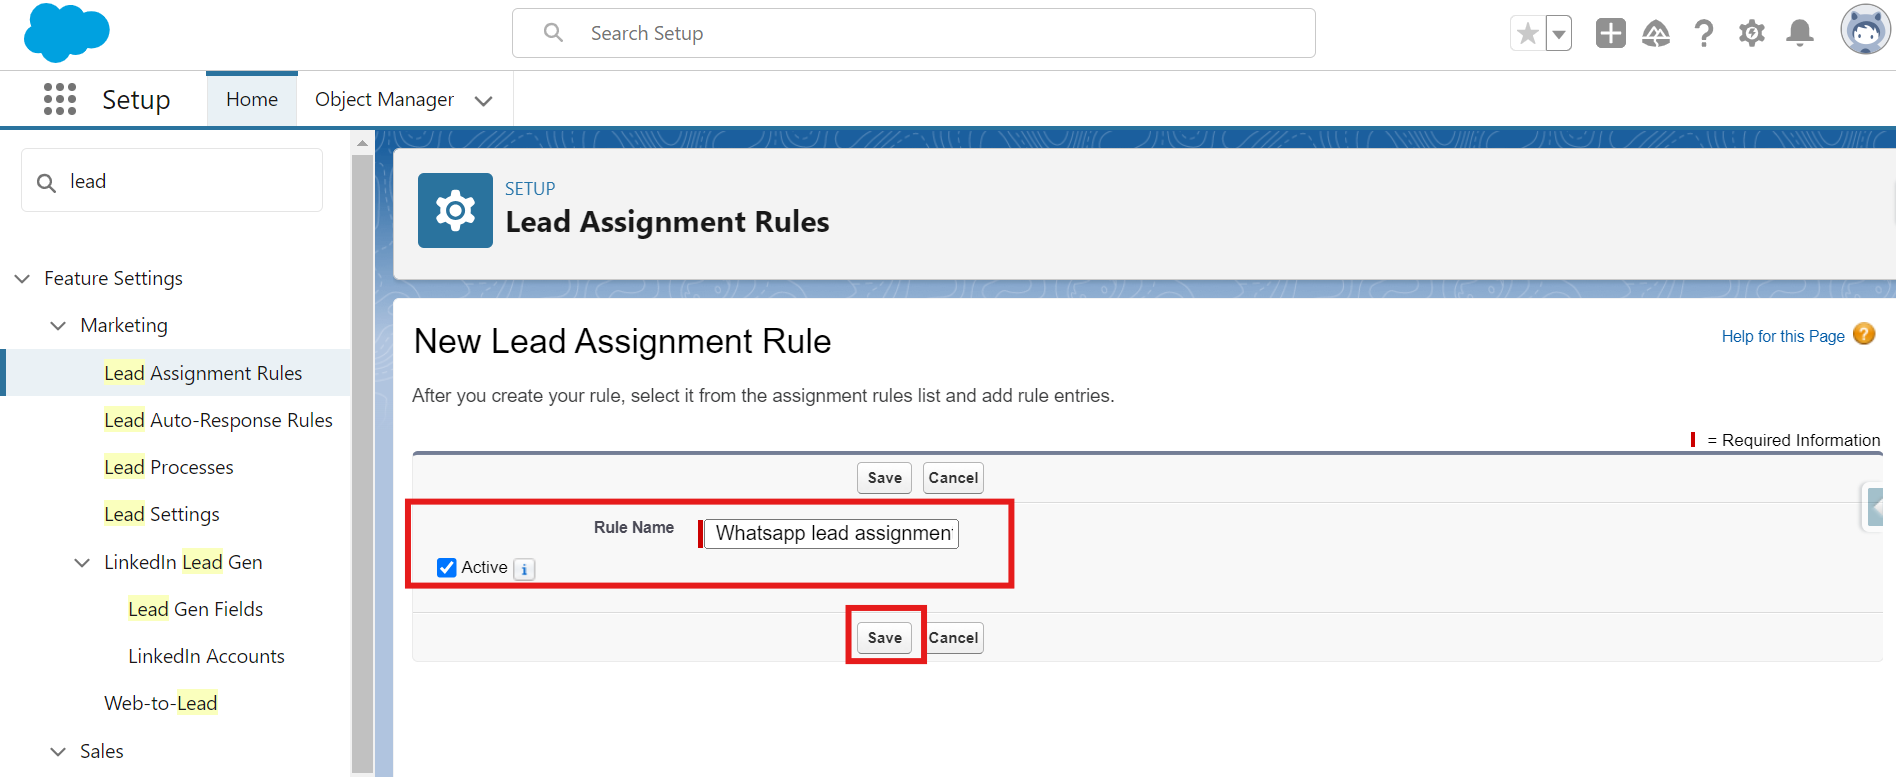
Define Rule Details:
- Rule Name: Enter a descriptive name for the rule, such as Whatsapp lead assignment.
- Active: Ensure the rule is marked as active if you want it to start working immediately.
- Click on the “Save” button to create a Lead assignment rule record.
Rule Details
-
Access the Lead Assignment Rule:
- After creating the Lead Assignment Rule, navigate back to the Lead Assignment Rules page.
- Locate and click on the rule you just created, such as "Assign Gupshup WhatsApp Leads to Queue", to open its record.
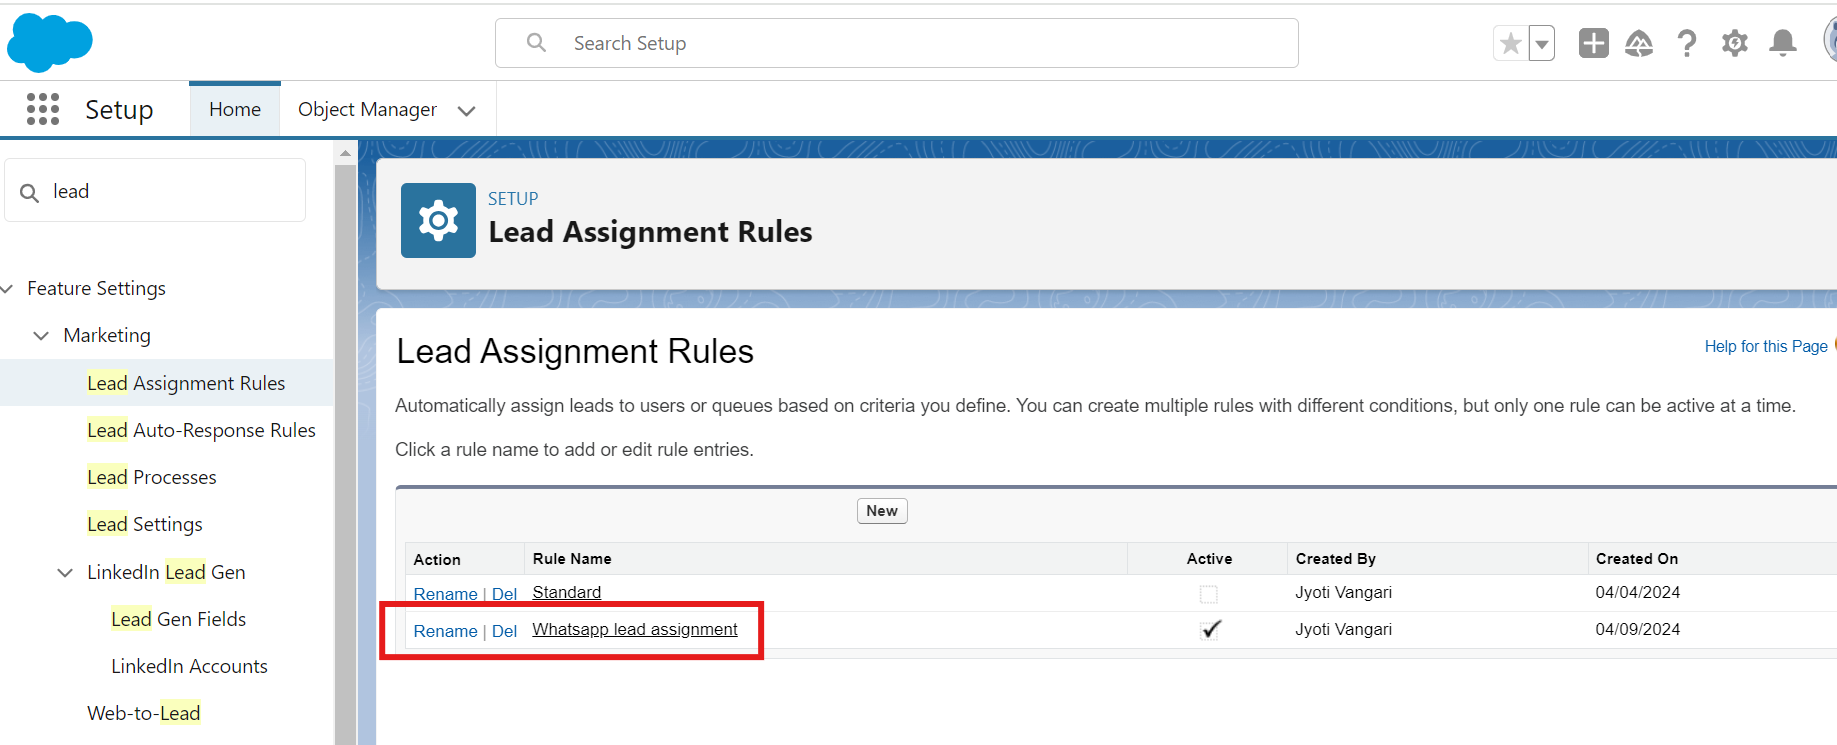
WhatsApp Lead assignment Rule
-
Add a New Rule Entries:
- After saving the rule, you'll need to create specific rule entries to define how leads are assigned.
- Click on "Rule Entries" related list on the rule detail page.
- Click on the "New" button to create a new rule entry.
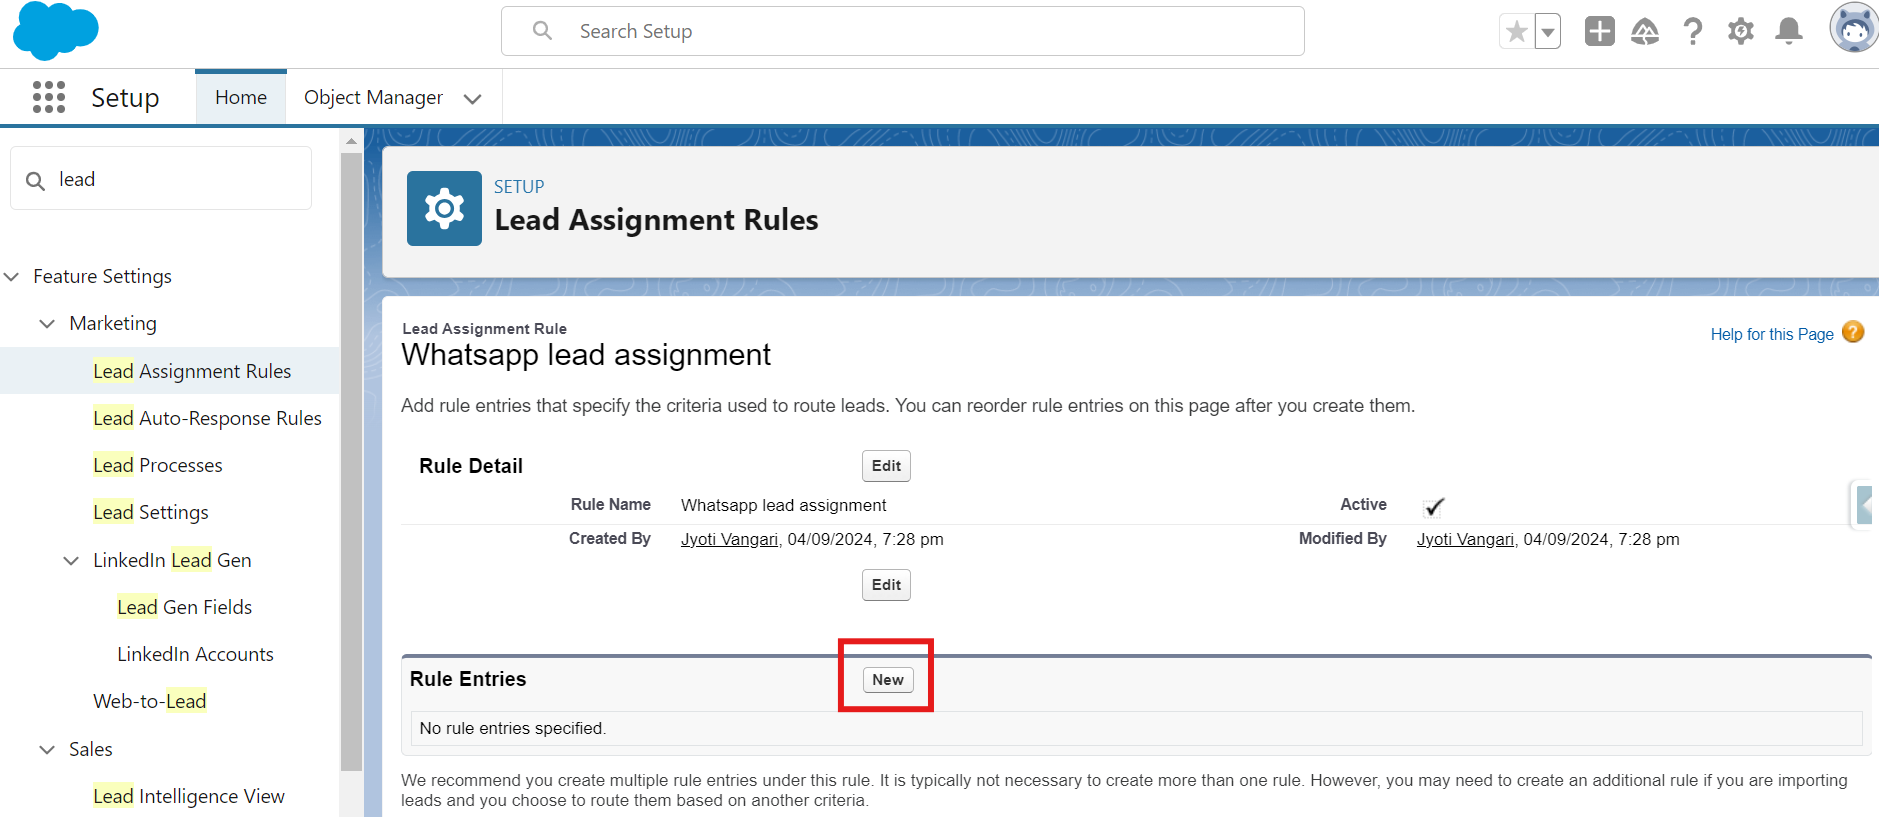
Add a New Rule entry
-
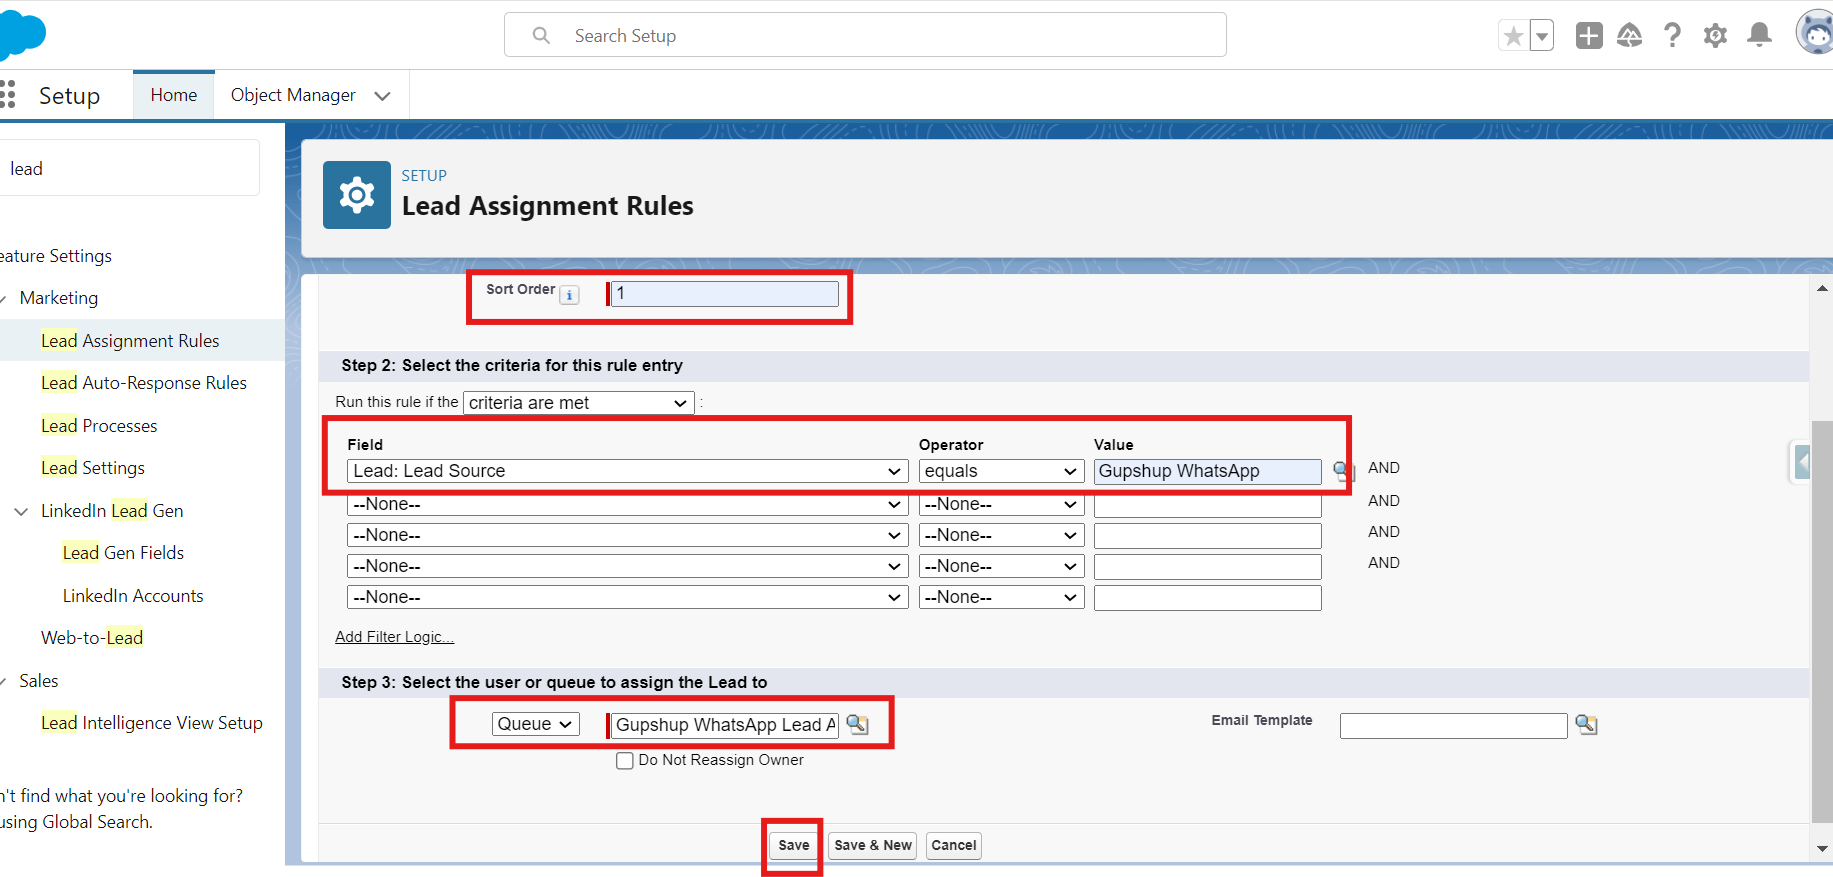
Define Rule Entry Criteria:
- Sort Order: Enter 1 to set the priority of this rule entry. The sort order determines the sequence in which rules are evaluated.
- Field: Select Lead Source (Field: Lead:Lead Source).
- Operator: Choose equals.
- Value: Enter Gupshup WhatsApp (the value that matches the incoming message source).
Define Rule Entry Criteria
-
Assign to Queue:
- Assign To: Choose Queue from the options.
- Queue: Select Gupshup WhatsApp Lead Assignment queue from the dropdown list.
-
Save the Rule Entry:
- Click the Save button to store the rule entry.
-
Activate the Rule:
- Ensure the rule is active by verifying that the Active checkbox is checked on the rule detail page.
Create and Configure Records in Gupshup Auto Lead Creation
- Access Salesforce Setup:
- Click on the gear icon located in the top-right corner of Salesforce.
- Select "Setup" from the dropdown menu to open the Setup page.
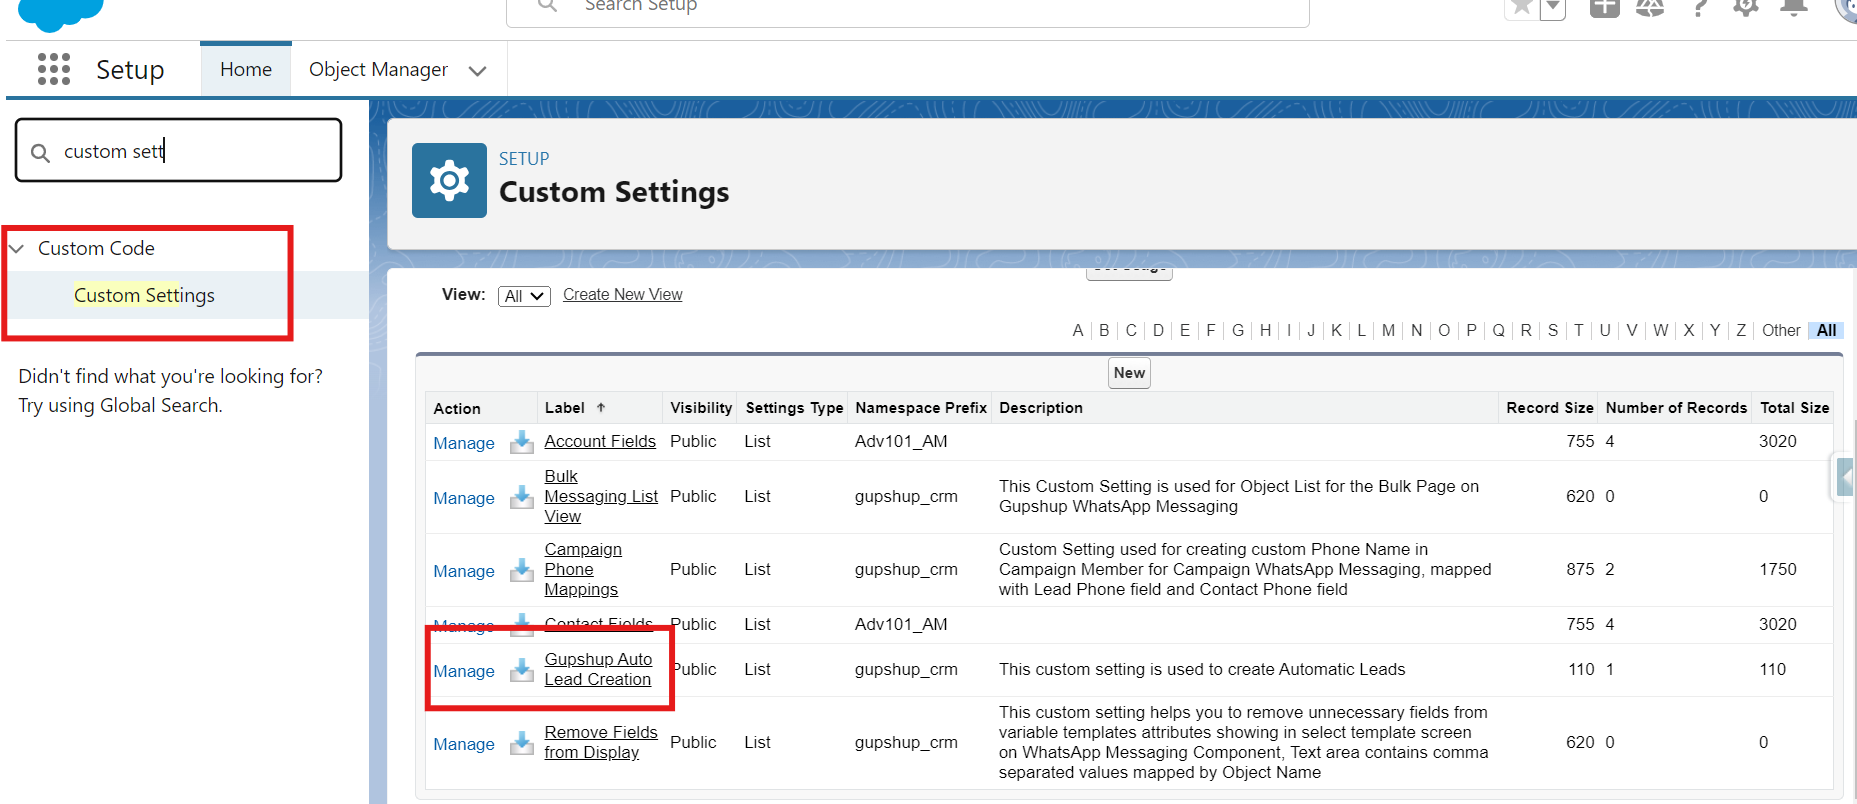
- Navigate to Custom Settings:
- In the Quick Find box on the left side of the Setup page, type "Custom Settings".
- Select "Custom Settings" from the search results.
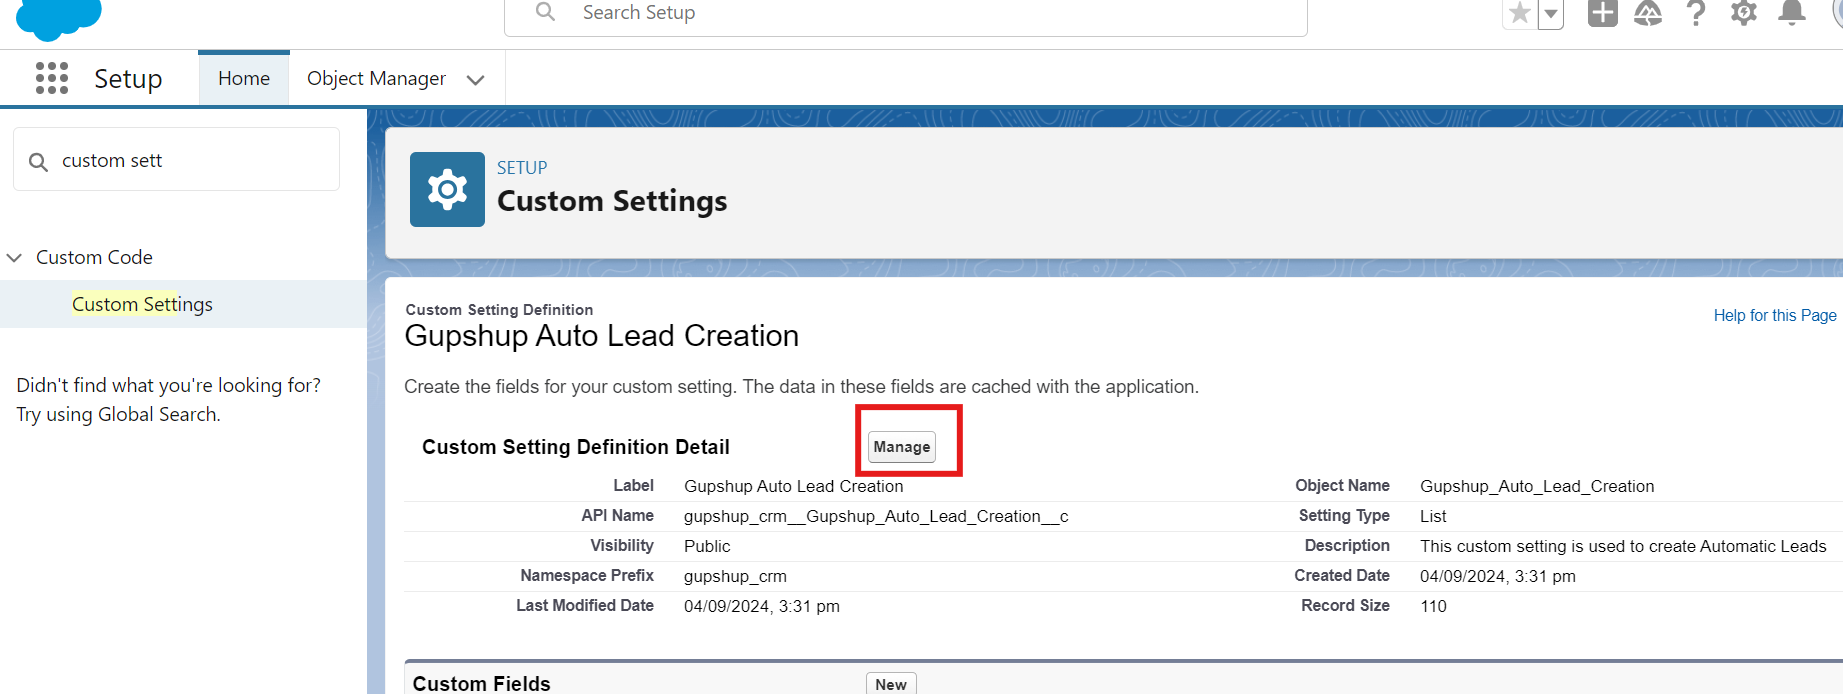
- Locate Gupshup Auto Lead Creation:
- In the list of custom settings, find and click on "Gupshup Auto Lead Creation". This will open the custom setting details page.
Custom settings - Gupshup Auto Lead Creation
- Manage Custom Settings:
- On the Gupshup Auto Lead Creation custom setting page, click on the "Manage" button. This will show the existing records for this custom setting and allow you to add new records.
manage custom settings
- Create a New Record:
- Click on the "New" button to create a new custom setting record.
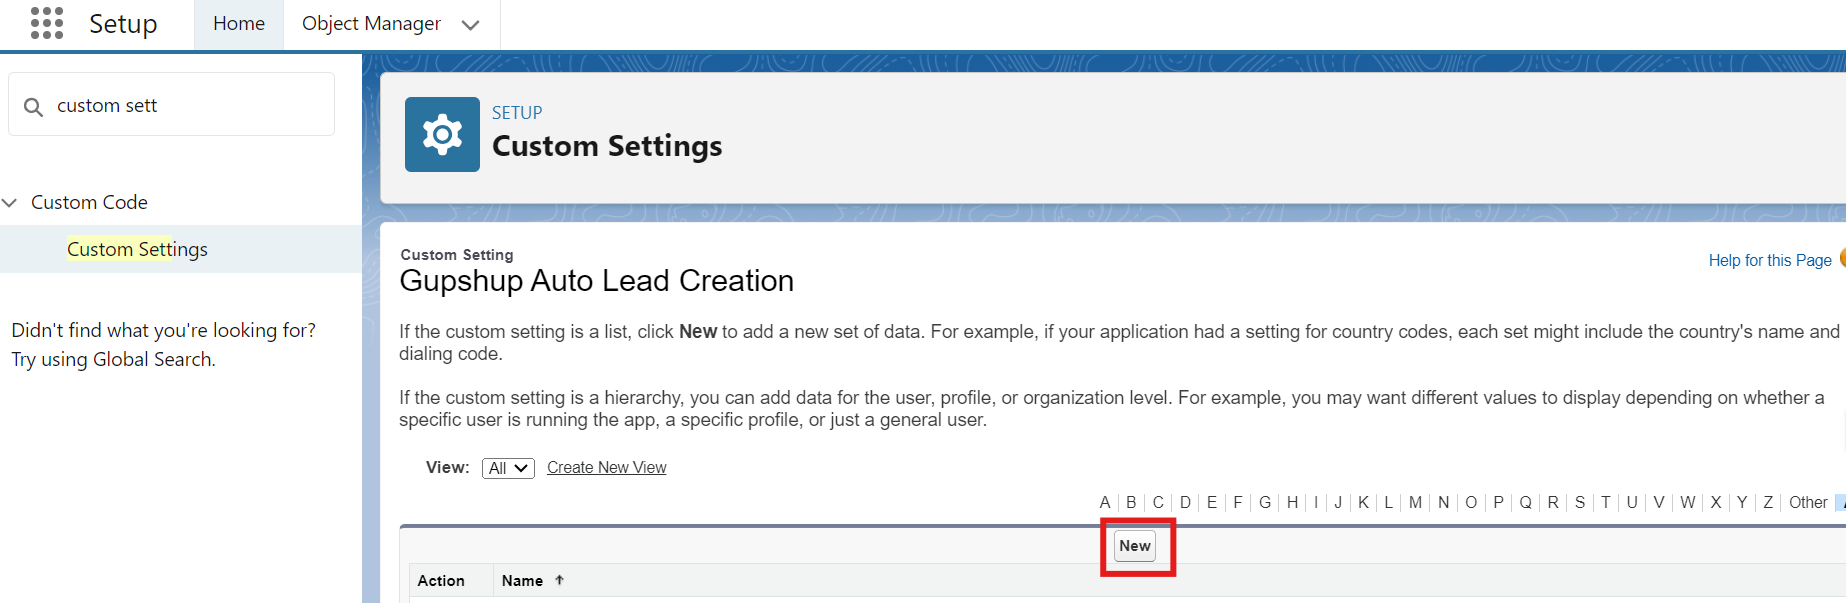
Create new record
- Fill in the Required Information:
- Name: Enter "Gupshup Auto Lead Creation" as the name for the new record.
- Auto Lead Creation: Check the box to activate the auto lead creation feature. This enables automatic creation of leads based on the specified criteria from Gupshup.
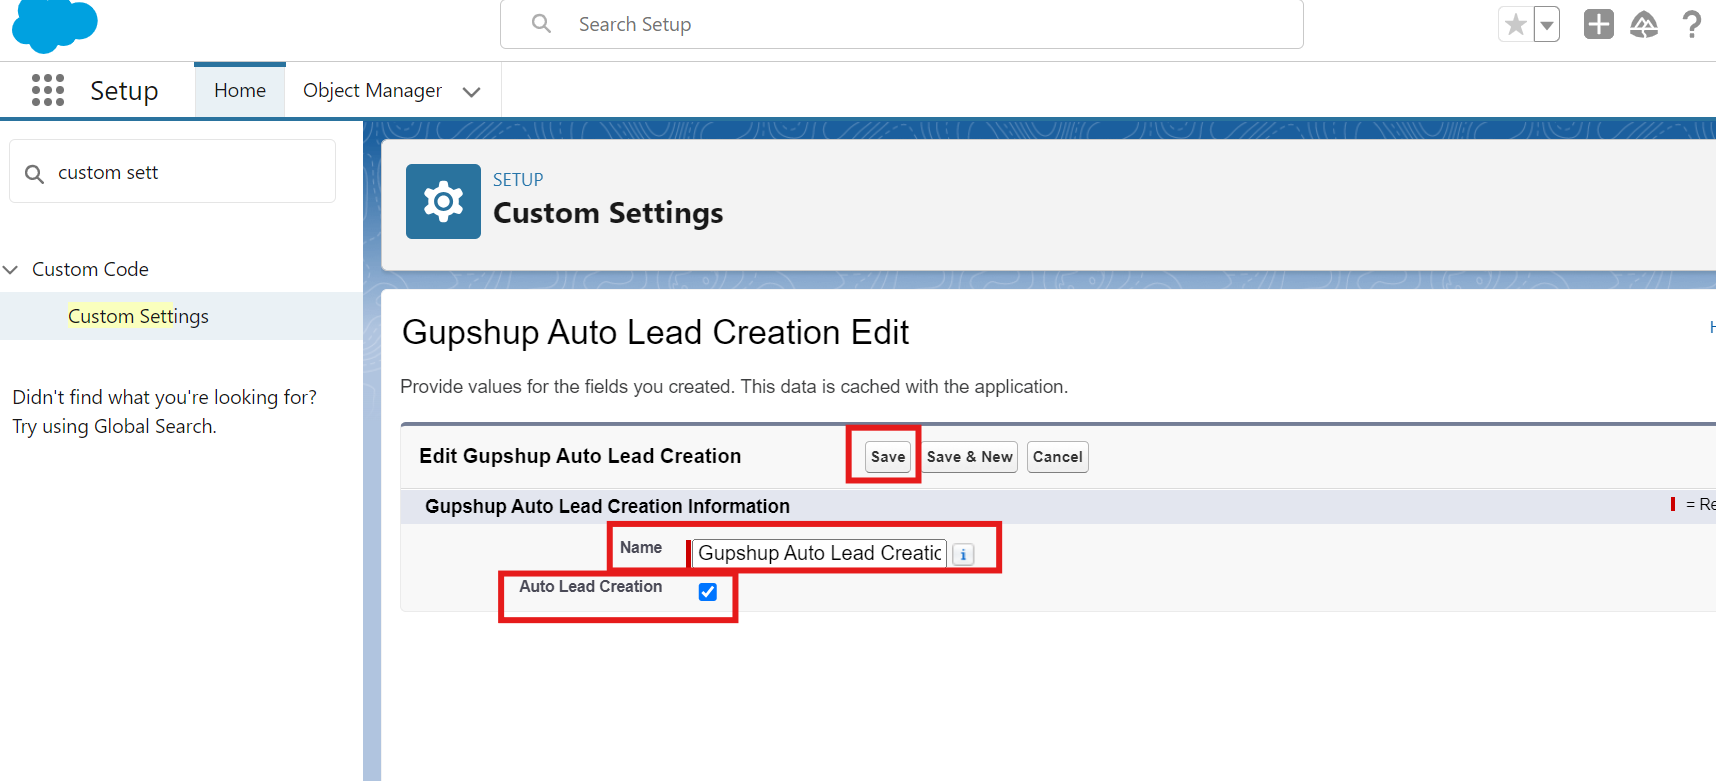
custom settings
- Save the New Record:
- Click the "Save" button to create and save the new custom setting record.
Video:
In this video, we explore the powerful integration provided by Gupshup, which seamlessly connects Salesforce CRM with WhatsApp for efficient messaging and campaign management. Learn how to streamline your communication processes and drive engagement effectively using this integration.
Gupshup Integration: Streamlining Salesforce CRM with WhatsApp for Seamless Messaging and Campaign Management
Updated 9 months ago