FAQs
1. How to add a Gupshup Self serve or Enterprise account ?
- While installing WhatsApp Messaging by Gupshup app, user can add one Gupshup WhatsApp account details to create 1 channel. You can add as many channels as needed, after installation.
- Open any contact, click on the Send whatsapp message button in the Gupshup CRM card section. In the select channel dropdown we have Add new channel option.
- Click on Settings icon and users can add a new channel.

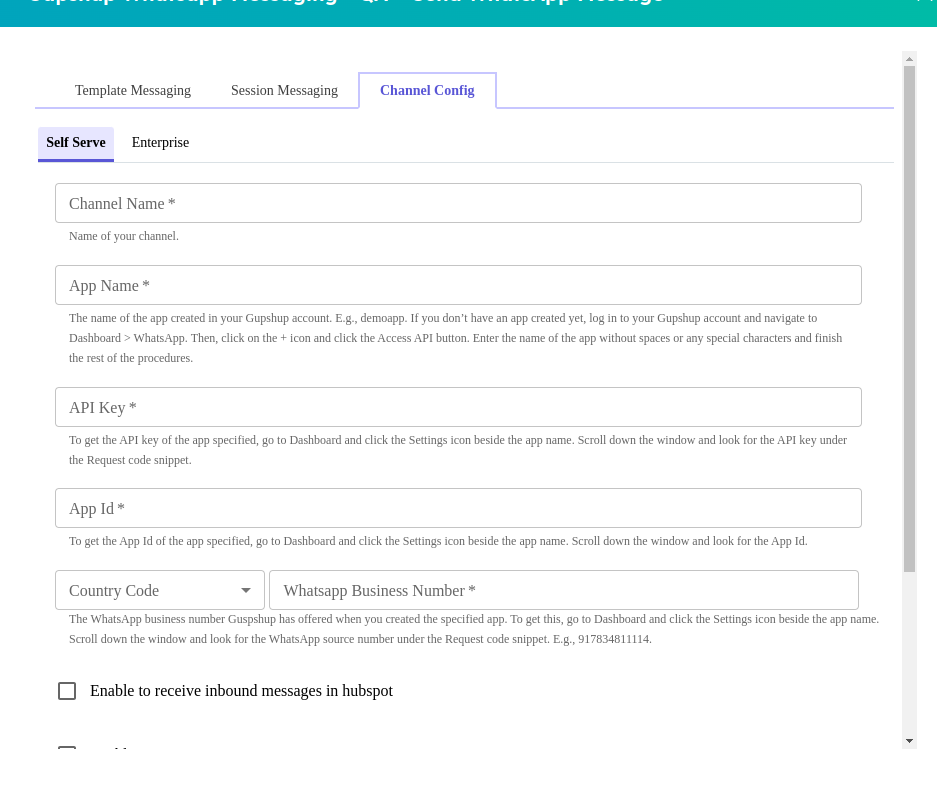
Create Self Serve Channel
2. Do we have any limitations on creating new channels ?
No, you can create as many channels as you require.
3. Do users have permission to edit the channel ?
Yes, users can edit previous channels and save the new channel configuration. To modify channel configuration - On the CRM card, click on the gear icon to edit the channel. Then select the channel, edit the values and save the changes.

Edit Channel
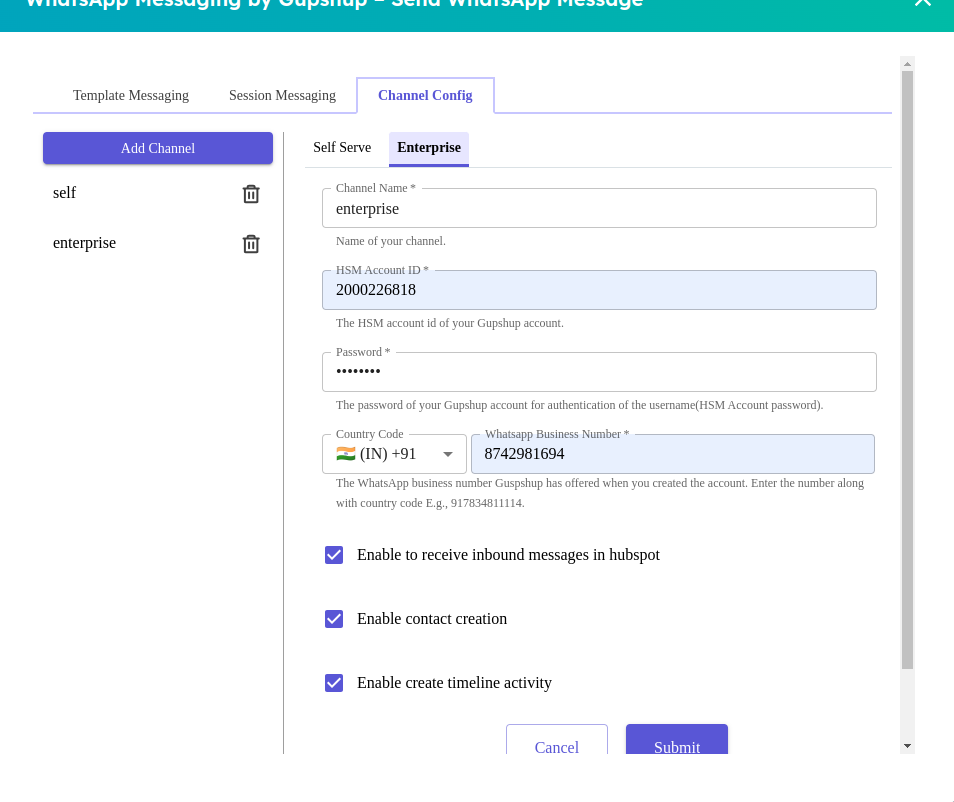
4. How to create an Enterprise channel on Hubspot ?
In the Gupshup CRM card select create channel and select Enterprise account Tab. Submit the credential of Gupshup enterprise account in the create channel form.
Channel name, HSM account ID, Password and Business Phone number of enterprise account is mandatory.
5. Do we need to Opt-in the customer contact number ?
No, In the Gupshup send template message feature we do not require you to explicitly Opt-in the customer contact number. This is managed automatically.
6. How can a user send the Media template message ?
On the Gupshup CRM card select the channel then select template category as Image or Video or Document. Then select the template from the dropdown list. Attach the media file from the device. After the media is uploaded in the CRM card click on the Submit button.
7. How we can create a Self Serve channel and set the callback URL ?
In the create channel form select the Self serve tab. Then add the Gupshup self-serve account details.
Following details are mandatory - Channel name, App name, API key and whatsapp business number. To set the callback URL of the self-serve account we have provided the functionality at time of creating the channel. Only we need to select the check box for Set callback URL to receive inbound messages.
8. What is the requirement to set a callback URL in the Enterprise and Self serve channel ?
In the Gupshup by Hubspot integration Gupshup is providing the two way message feature with the contacts. To receive the customer response on the Hubspot side we need to set up the Hubspot callback URL in the Gupshup account. Once the callback is set then the user can receive the customer message in Gupshup CRM card and the user is able to send the normal text message to the customer on whatsapp.
9. How to set a callback for an Enterprise account ?
To set a callback URL for an enterprise channel we need to share email with the Enterprise team([email protected]). Mentioning to set inbound URL and DLR events to the HSM account ID and callback URL ( https://asia-south1-integrations-service-10ecc.cloudfunctions.net/wrapperServices/v1/event/enterprise/callback/hubspot ) of the Hubspot. Once we get confirmation from the enterprise team we can use a two way message feature.
10. Does Gupshup provide Bulk message features in the Hubspot ?
Yes, using the Hubspot workflow we can share the bulk message on multiple contacts at time.
11. How to create a new workflow with Gupshup ?
In the Hubspot header, Automation menu dropdown - select the Workflow option.
Now click on the Create workflow button and select From Scratch option.
In the create workflow form select the blank workflow option and click on Next. Update the workflow name and in the contact enrollment section allow the re-enrollment.
Then add the Gupshup bulk action trigger in the workflow. In the action select channel name. Then select template category and template. After saving the workflow Click on Review and Publish button.
12. How to add variables in the workflow ?
To add variables first we need to select a template with variables. Suppose if we select template with 2 variables then in the template variable field we should provide the string with following format {“Variable Name 1”:”Variable Value 1”, “Variable Name 2”:”Variable Value 2”} We can add the token value at the variable value place.
13. What is the procedure to get a media URL for attachment in the workflow ?
In the Hubspot header select the Marketing - Files menu. Then click on the Upload file button and select the appropriate file from the device. Once a file is uploaded then click on the details button. From the file details click on the Copy URL button and paste the same URL in the workflow.
14. Do we have any media URL validations in workflow ?
We can add a media file which is available only in the Hubspot file section. Media type depends on the template category which we have selected in the workflow. For image template we can attach .jpeg and .png format files. In the video template we can select the MP4 format file and for the document file we should attach a PDF format file.
15. How can users enroll the workflow for bulk messages ?
There are two ways to enroll in the workflow. From the contact list select the customer and click on More button and select Enroll in Workflow option. Then select a workflow from the list and click on Enroll.
We can also add multiple triggers in the workflow so after the event is triggered workflow should get enrolled automatically.
16. If the user does not have a Gupshup account then how can they use the Gupshup CRM feature ?
This feature is for use only with Gupshup Self Serve or ENterprise accounts. To create a new account please reach us to [email protected] or https://www.gupshup.io/
Set callback URL for Enterprise WABA account :**
Please reach out to your account manager to set the Callback URL for your account in order to receive inbound message webhook events. Only one callback URL can be specified per account.
Write an email to [email protected]
Topic: Set Callback URL for Enterprise Account
Body: Kindly set the callback URL to https://integration-apis.gupshup.io/wrapperServices/v1/event/enterprise/callback/hubspot
HSM Account : < Your HSM Account Number >
Updated 3 months ago
