Try Catch
Be handy with exemptions occurring in an automated workflow. Try Catch looks for errors for actions configured in the try block. If found, the catch block reports the errors and stops the execution.
Gupshup Integration platform does well with handling exceptions using the Try Catch functionality. In technical terms, Try and Catch are the two exception handling terms that take care of errors when a piece of code is in the execution state.
Talking in terms of automation journeys, the Try block contains a list of actions ready for execution, and the Catch block contains the actions that need to be executed if any action in the try block fails. Most importantly, the Try Catch block helps to ensure the execution of a journey doesn't stop even if an action fails. Thus, the malfunctioning of the system is handled and the user gets the benefit of getting a proper response i.e. the user is not left hanging waiting for a reply and receives an evident success or error response:
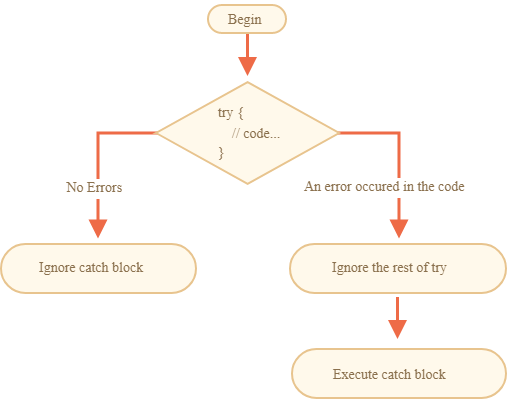
Figure 1: Try Catch flow chart
Let's consider a simple use case to understand the working and behavior of the Try Catch block.
Use case
Bob, a 25-year-old techie, believes more in online marketing on social media platforms than being a professional email rattler. He hates switching between apps now and then as he's entirely dedicated to the company's Facebook Page brand endorsement. He needs a solution that can enable him to send emails to customers from the Facebook Page's messenger. Bob and other employees visiting the company's Facebook page should be able to send emails directly rather than switching to Gmail and do the needful.
In case, if an invalid email address is specified, the user must be notified with an appropriate error message—not terminating the journey execution.
To build an automation solution for this use case, you need the following elements:
- Trigger: Facebook Messenger—New text message
- Actions: Facebook Messenger—Ask a question, Gmail—Send an email, and Facebook Messenger—Send message
- Try Catch condition
Let's start creating a journey.
Configuring Facebook Messenger—New text message trigger
This will listen to a new text message from a user. Follow these steps to configure:
- Choose the Facebook Messenger app from the Apps list present right below the New Trigger block.
- Select the trigger event, i.e., New text message, in the Triggers list.
- To authorize a new Facebook account, click on the Link an account button. In the Connection window, enter the connection name of your choice and specify the Facebook Page ID in the Page ID field. Go to your Facebook Page you want to connect and take a look at the web URL. If your web URL is https://www.facebook.com/demo-page-107454971505632/?ref=pages_you_manage then 107454971505632 is your Page ID.
- Once specified, click the Link Account button. If you have already linked an account, you'll get a drop-down menu to select the existing connection.
5 Once done, your configured trigger will look like this:
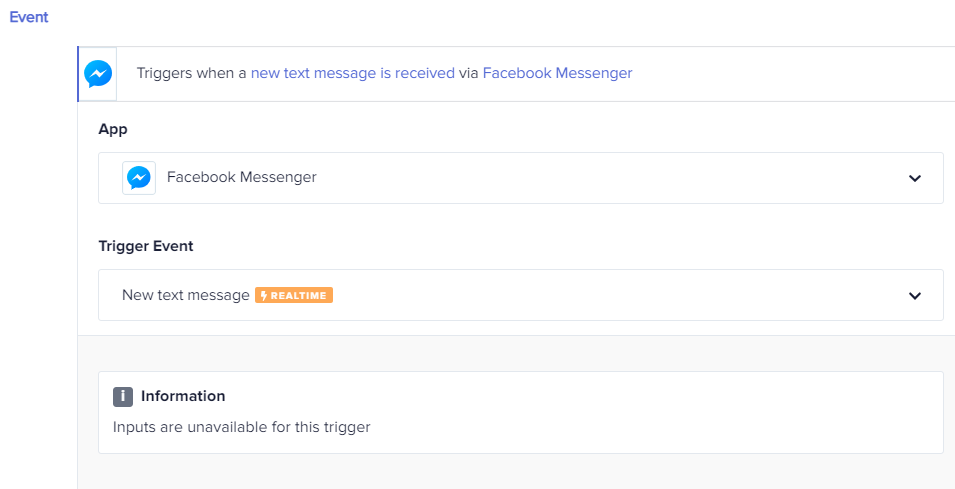
Figure 2: Facebook Messenger trigger
Configuring Facebook Messenger—Ask question action
This action will serve as the first response message to a user visiting the Facebook page connected in the trigger and will be asking the user to provide their email ID. Let's start configuring it:
-
Under the Steps section, click on the Simple Action button. Choose the Facebook Messenger app from the drop-down menu. Select the Ask Question action from the drop-down menu of the Actions list.
-
Since we already have an active connection of the same app in the current journey, you don't need to create it again, and the following fields will open up automatically in which you need to enter the required details:
1. In the User question field, specify Enter the email address to whom you want to send an email.
2. In the Answer type field, select Text from the drop-down menu.
3. In the Retry help field, specify a suggestion to enter a valid email ID. E.g., Please enter a valid
email ID in this case.
4. In the Recipient field, parse the data pill from the trigger response:Note: The Sender Id data pill is the Facebook Page ID that we have configured while establishing a connection. We will parse and get all the replies on this data pill.
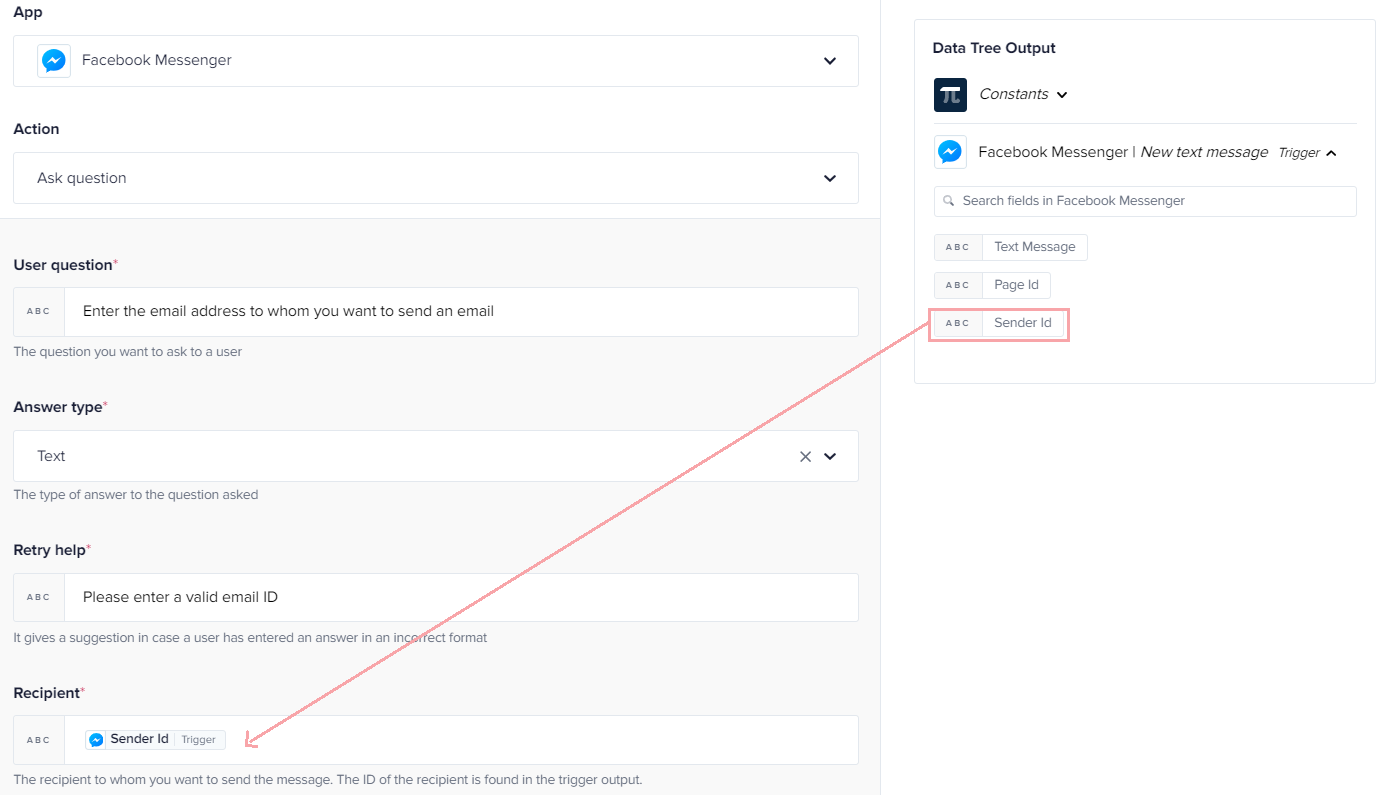
Figure 3: Facebook Messenger-Ask question action configuration
Configuring another Facebook Messenger—Ask question action
This action will help us send another response, specifying the email content to be sent, to the user when he/she completes entering the email ID.
To do so, we will need the same action, Ask question, to continue configuring the journey. Simply, clone the previous Facebook Messenger action by clicking on the Clone Step button. Now, let's do some alterations in the input fields as discussed here:
   1. In the User question field, specify Enter the email content you want to send.
2. In the Retry help field, specify a suggestion to enter the content within the character limit. E.g., The email content should not exceed 2000-character limit, in this case. 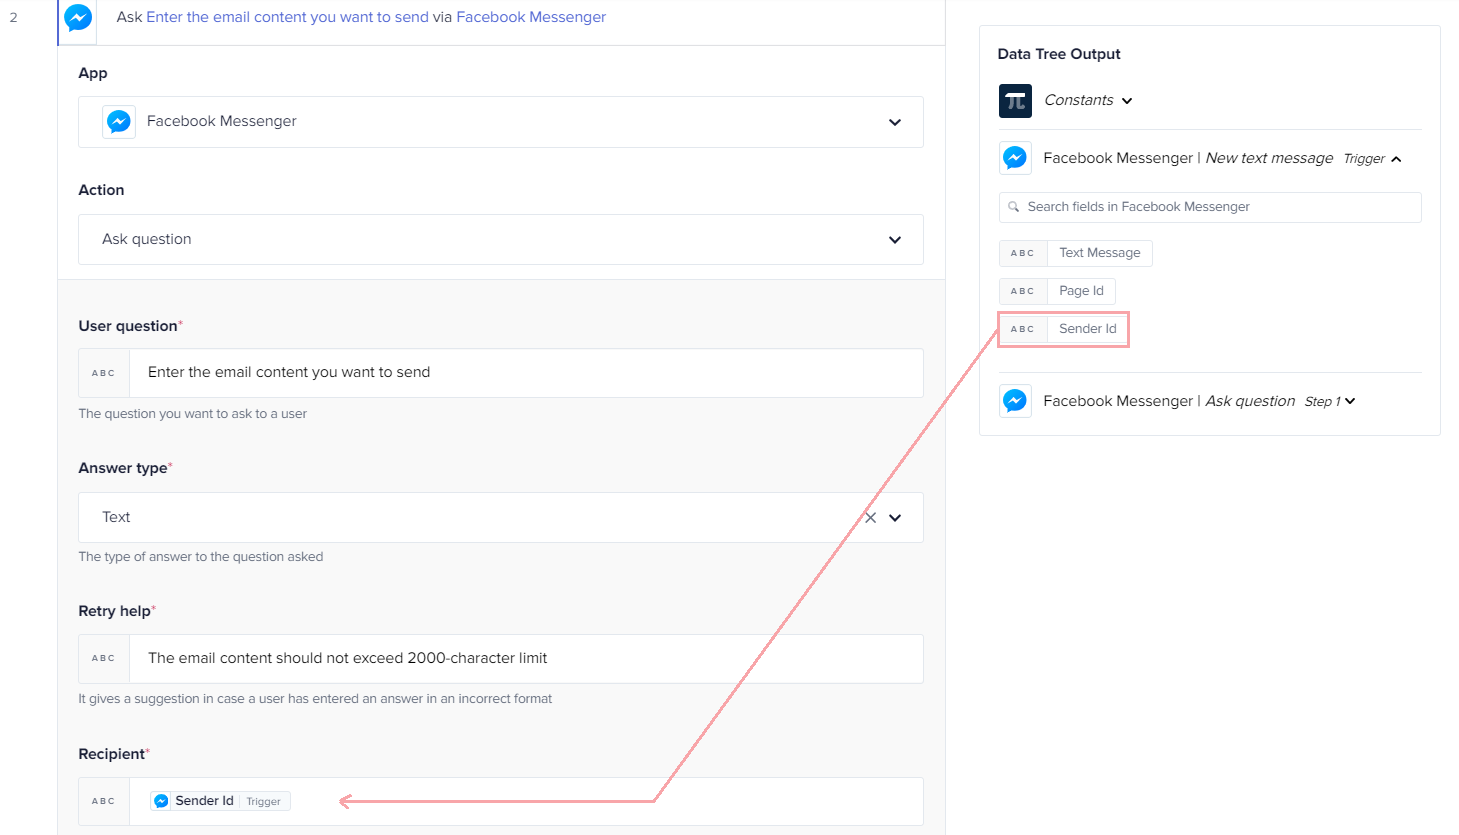
Figure 4: Another Facbook Messenger-Ask question action
Using the Try Catch block
Whenever a journey faces an error, there is no endpoint flow to show the failure status until the user heads towards the History tab and searches for the error's root cause.. However, in this case, we will be using the Try Catch block, which would not only successfully execute our journey, but would also highlight the error, if any, in the response without stopping its execution.
To add the Try Catch block, click the Add a step button (+ icon) and then click Business Logic. Select the Try Catch option from the drop-down menu.
Configuring Gmail action in the Try block
This action will send an email to the email ID that the user will specify as an input to Facebook Messenger:
-
Under the Try block, click on Please choose an action.
-
Choose the Gmail app from the drop-down menu in the App field.
-
Select the action, Send email, from the drop-down menu in the Action field.
-
Authorize and connect your Gmail account from which you want to sent the email to the customer. Once a connection is created, the following fields will open up in which you need to enter the details as follows:
-
In the To field, parse the
 data pill from the first action, Facebook Messenger—Ask question data
output tree. -
Enter the subject as Email Via Facebook Messenger in the Subject field.
-
In the Message field, parse the
 data pill from the second action, Facebook Messenger—Ask question Data Tree Output:
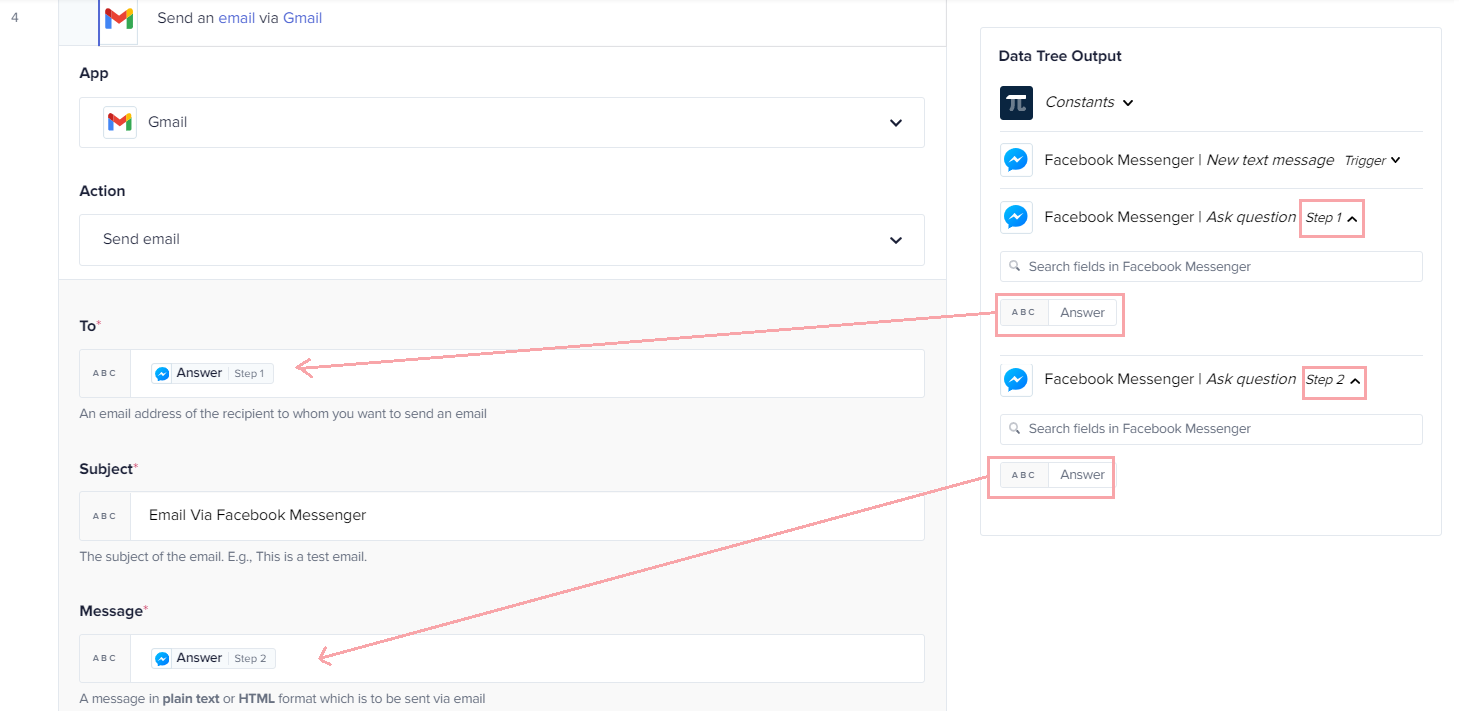
image (49)
Configuring Facebook Messenger action under the Try block
It's necessary to notify the user when the email gets sent successfully otherwise, the user might lose interest in not getting a proper response. The Facebook Messenger — Send message serves the needful. Follow these steps to configure:
- Clone the Gmail — Send email action by clicking on the copy icon.
- Open the cloned action and select Facebook Messenger from the App field drop-down menu.
- Choose the Send message action for the Action field.
- The connection will automatically get established as we already connected the Facebook account previously.
- In the Message type field, select Response.
- Parse the
 data pill to the Recipient field and enter This email has been sent successfully as a response in the Message text field:
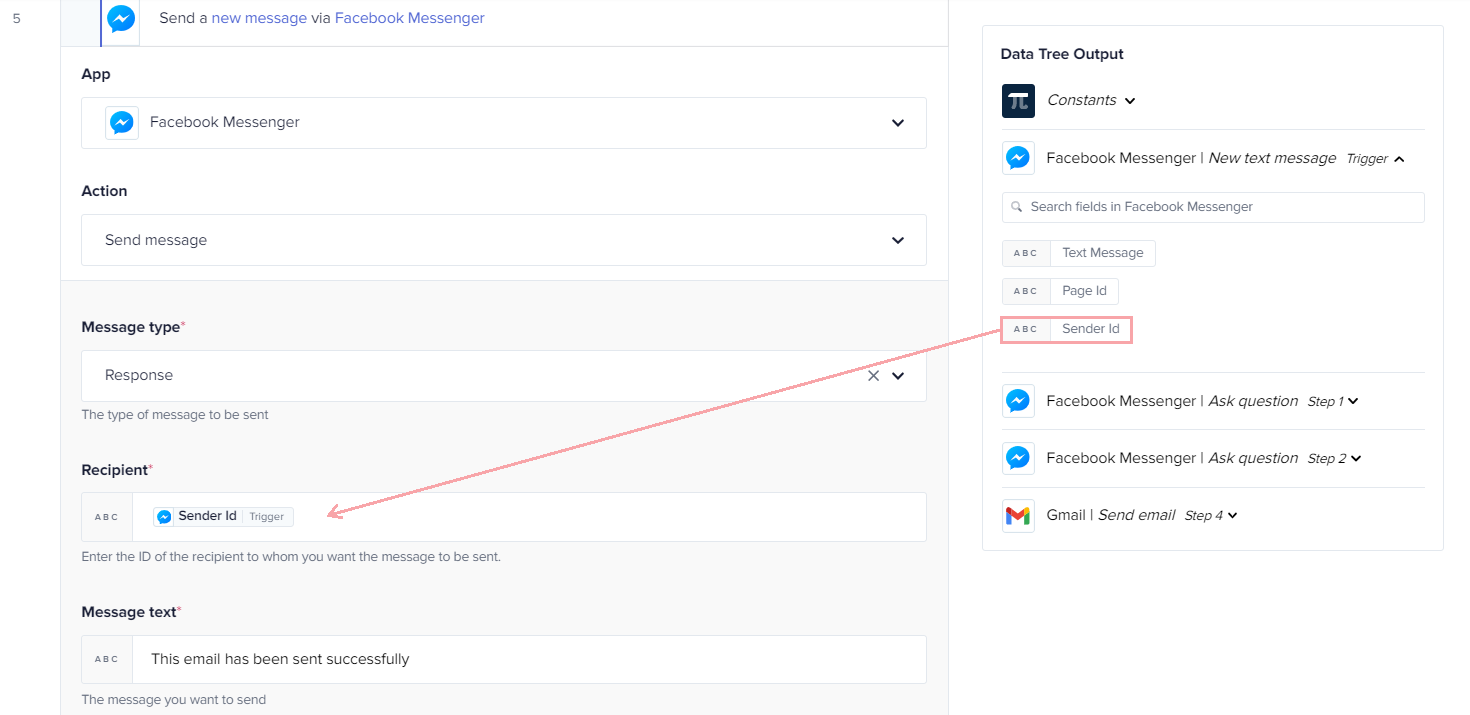
Figure 6: Facebook Messenger action under the Try block
Bringing the Catch block into play
The journey we configured until this point was for a proper valid response. What about handling the exception in case of invalid user input, i.e., email address? The Catch block will help to do so. As Facebook Messenger is the go-to app in our use case, we will configure for one more time to handle the exception:
- Click on the Please choose an action bar under the Catch block.
- Search and choose the Facebook Messenger app from the App field drop-down menu.
- Select the Send Message action from the Action field.
- The connection will automatically get established as we connected the Facebook account previously.
- In the Message type field, select Response.
- Parse the
 data pill to the Recipient field and
  from the Catch block data output tree as a response in the Message text field:
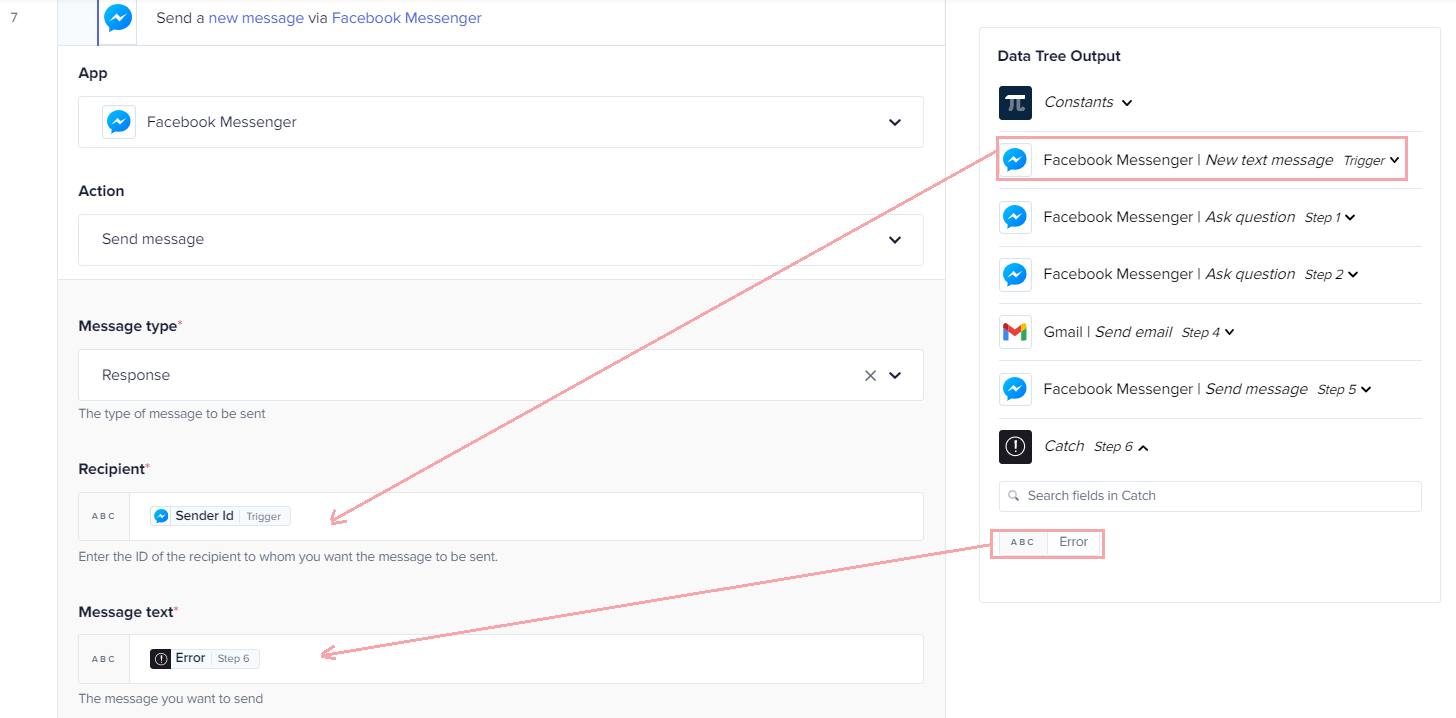
Figure 7: Using the Facebook Messenger action the Catch block
Here, we have completed configuring an event and all the actions that our journey requires. The complete journey outlook would look like this:
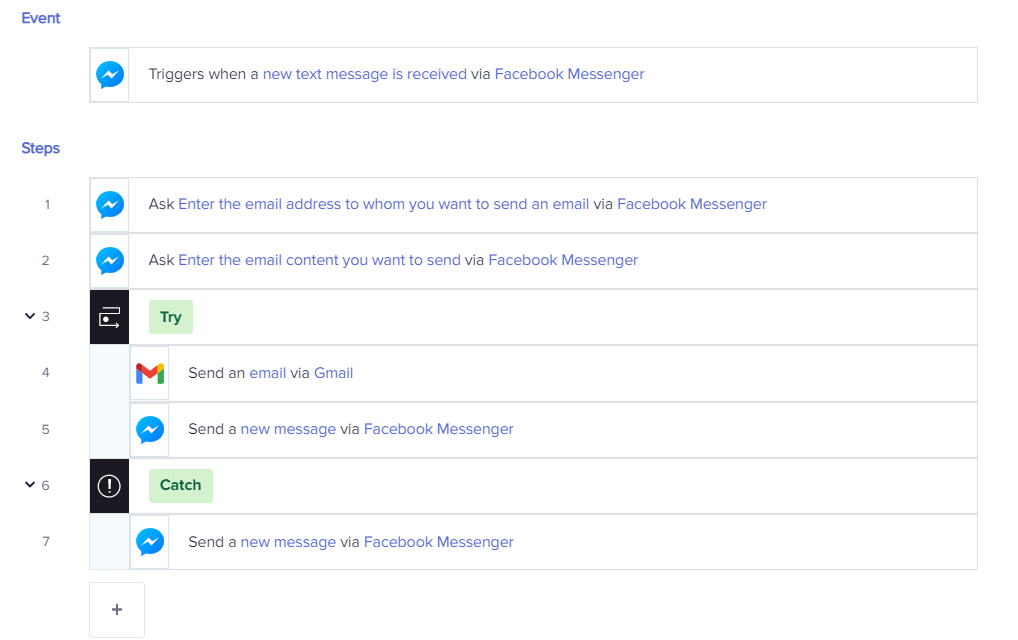
Figure 8: A complete Try Catch journey
Executing the journey
Click the Save & Start button and go to your Facebook Messenger account. Search the Facebook Page that you have connected with the journey. Now, send a message, say Hi, to the Facebook Page:
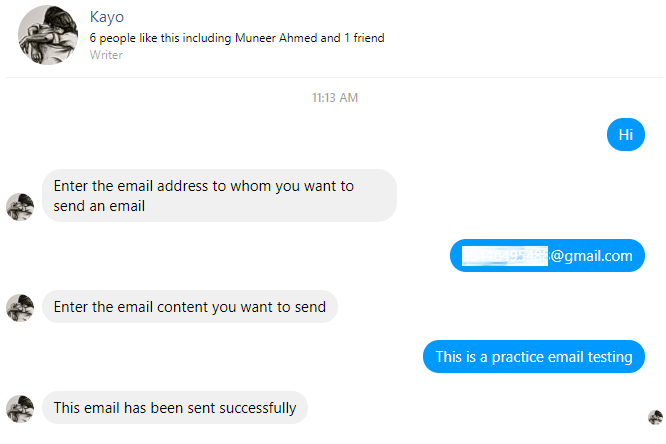
Figure 9: Successful execution
The page will automatically ask you to enter the email ID. Once done specifying the email address, the Facebook Page will ask you to enter the email content. As soon as you specify the content and hit the enter button, the email will be sent to the specified email ID, for which you will get a confirmation message on the messenger. For the sake of cross verification, check the SENT folder of your Gmail account that we have configured with the journey:
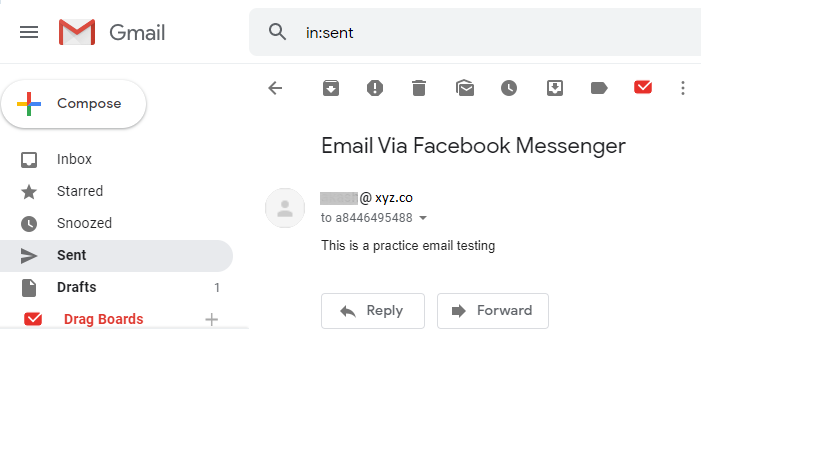
Figure 10: Email sent successfully
In the case of the invalid email ID, the messenger will pop up an error notifying you that the email was not sent:
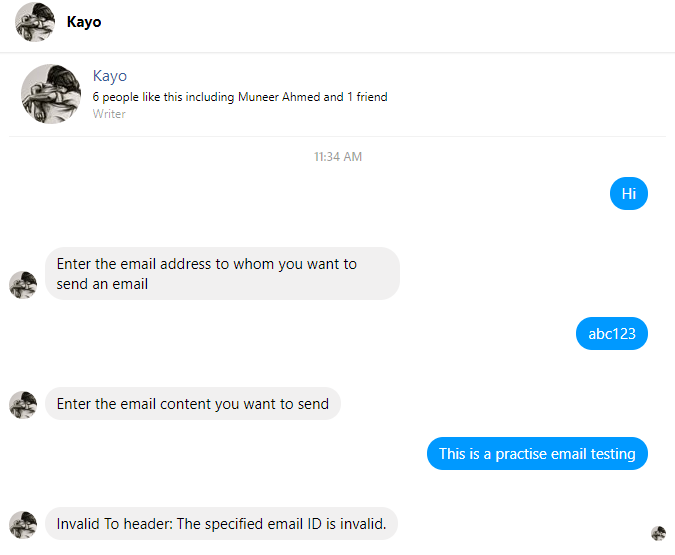
Figure 11: Exception handled
Updated 4 months ago
